多线程 - IOS的多线程方案总结
前言
一、主线程和子线程的区别
二、IOS - 子线程操作UI
三、IOS - NSThread
四、IOS - performSelector
五、常用的多线程方案
了解了进程和线程的区别、线程的原理、线程优缺点等知识点之后。具体总结一下IOS的多线程使用。
一、主线程和子线程的区别
先来看一个demo:
- (void)viewDidLoad {
    [super viewDidLoad];
    // Do any additional setup after loading the view.
    //创建一个子线程,执行test任务
    NSThread *thread = [[NSThread alloc] initWithTarget:self selector:@selector(test) object:nil];
    [thread start];
}

- (void)test {
    //在子线程中,添加一个timer
    NSTimer *timer = [NSTimer timerWithTimeInterval:1 target:self selector:@selector(run) userInfo:nil repeats:true];
    //添加到runloop中
    [[NSRunLoop currentRunLoop] addTimer:timer forMode:NSDefaultRunLoopMode];
    //开启runloop,保持循环
    [[NSRunLoop currentRunLoop] runUntilDate:[NSDate distantFuture]];
}

- (void)run {
    NSLog(@"1");
}

- (void)touchesBegan:(NSSet<UITouch *> *)touches withEvent:(UIEvent *)event {
    //点击屏幕,让主线程退出
    [NSThread exit];
}
开启一条子线程,在子线程中开启计时。然后我点击屏幕让主线程退出。此时主线程会被杀掉吗?如果主线程杀掉,子线程会仍然保持运行吗?
答案是:主线程会被杀掉,子线程仍然会保持运行,而且app不会崩溃,但是点击屏幕之后,所有UI都无响应了。
通过这个demo可以总结:
对于操作系统来说,app的主线程就是一个子线程,所以主线程和子线程在本质上没有任何区别。
但是IOS系统对待主线程和子线程是有区别的,它的区别在于:所有的UI渲染都必须在主线程上执行。
之所以放在主线程,是因为考虑到性能问题:
如果在渲染UI的时候,用多个线程去操作,会产生混乱问题。要么只用一条线程去加载,要么就通过多线程加锁来解决线程安全问题。
通过多线程加锁方案,首先开启多个线程会耗费cpu的资源以及占用内存,同时加锁也会耗费性能。基于这种情况考虑,苹果选择了用一条线程来加载渲染UI。
二、IOS - 子线程操作UI
在了解子线程和主线程的区别之后,抛出一个问题,如果在子线程操作UI,比如在子线程更新UILabel的text,会有效果吗?
首先明确一点:子线程里面是可以更新UI的。
比如我们在设置UI文字、背景颜色等,简单的来说是通过Core Animation 将处理过后的Layer递归打包发送到RenderServer,最终通过GPU渲染。在这个过程中,UI操作涉及到访问各种View对象的属性和渲染。如果我们在子线程去操作,由于UIKit不是线程安全的,所以会造成最少两个方面的问题:
(1)会存在读写不一致的问题。
(2)在渲染方面,由于图像的渲染需要以60帧的刷新率在屏幕上同步更新,在非主线程异步的情况下,无法确定这个处理过程能够实现同步更新。
所以简单的或者极少数的UI操作,比如设置文字,颜色等,在子线程中可能会及时更新。但是非常不建议在子线程中去做UI相关的操作。
三、IOS - NSThread
1、 NSThread基本用法
(1)创建一个thread,然后执行start方法
NSThread *thread = [[NSThread alloc] initWithTarget:self selector:@selector(test) object:nil];
[thread start];
(2)通过detach来默认启动一条线程
+ (void)detachNewThreadWithBlock:(void (^)(void))block API_AVAILABLE(macosx(10.12), ios(10.0), watchos(3.0), tvos(10.0)) NS_SWIFT_DISABLE_ASYNC;

+ (void)detachNewThreadSelector:(SEL)selector toTarget:(id)target withObject:(nullable id)argument;
(3)通过alloc出NSThread创建线程的时候,需要手动执行start方法,紧接着会执行main方法。
而通过detachNewThread来启动线程,会默认创建NSThread并执行start方法。
下两个符号断点:-[NSThread start]和-[NSThread main],通过汇编分析:
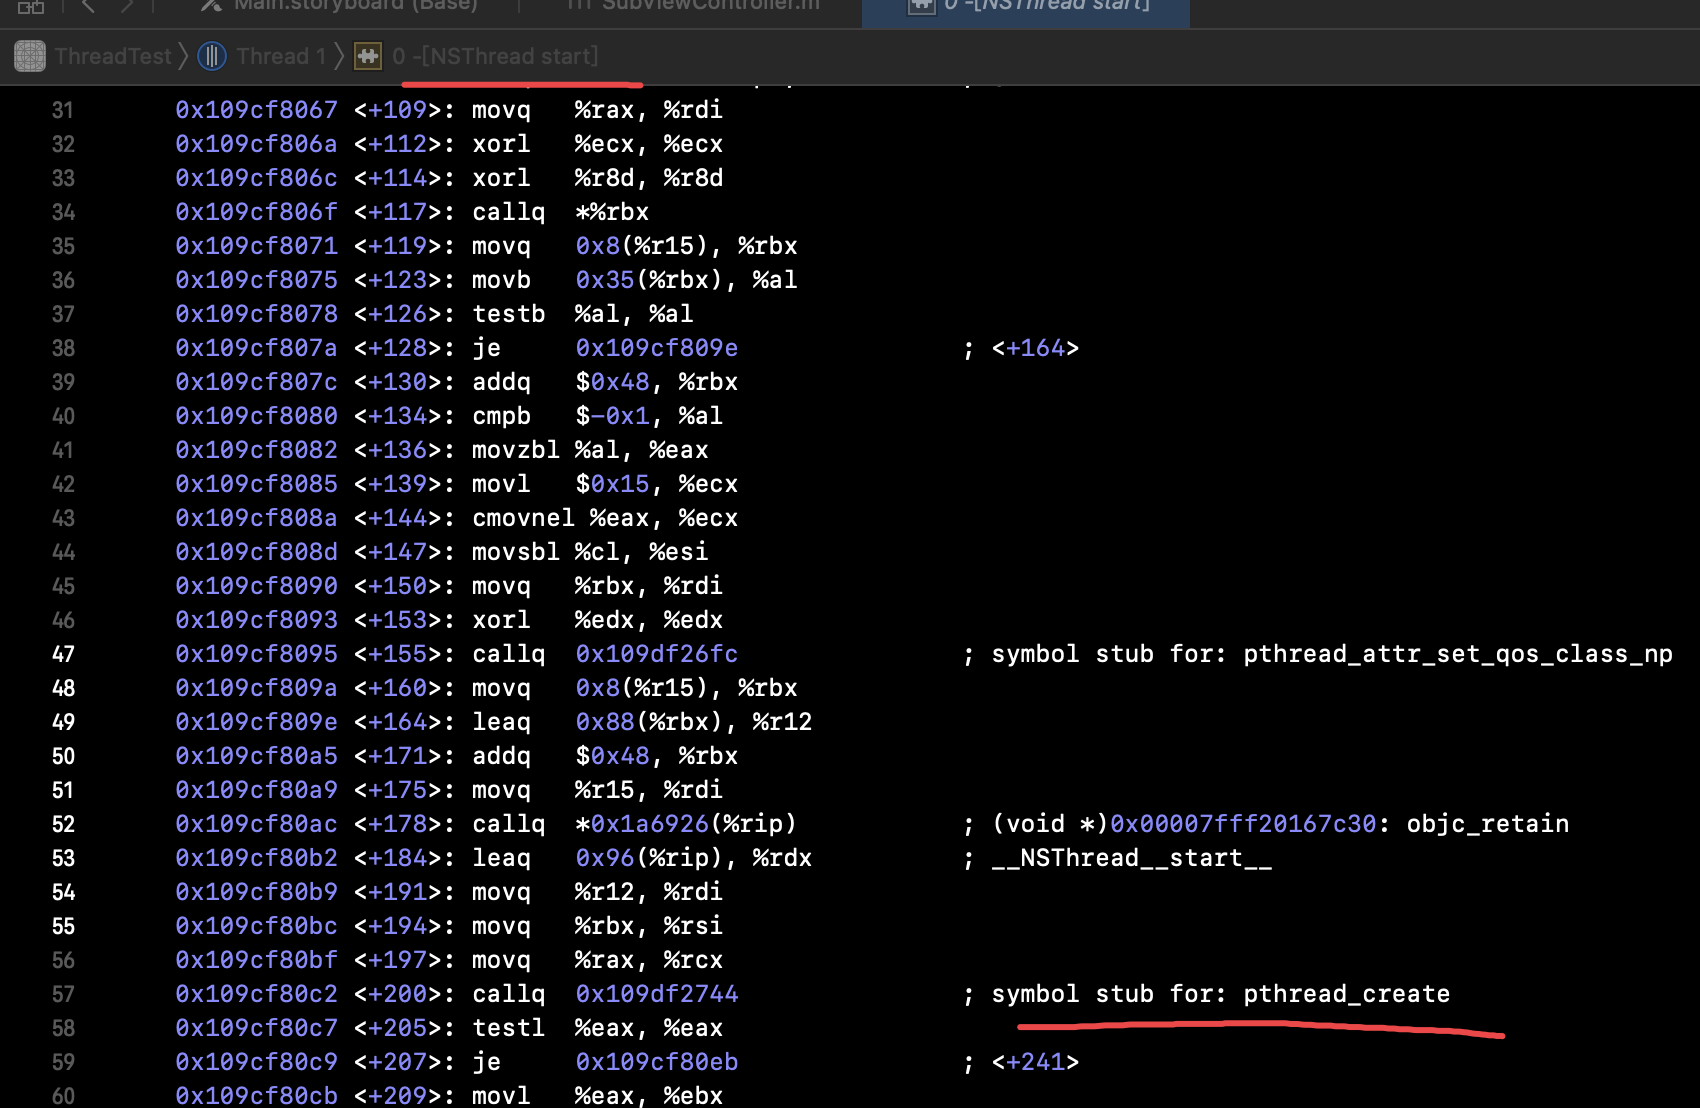
在start方法中,会通过pthread_create来创建一条线程。
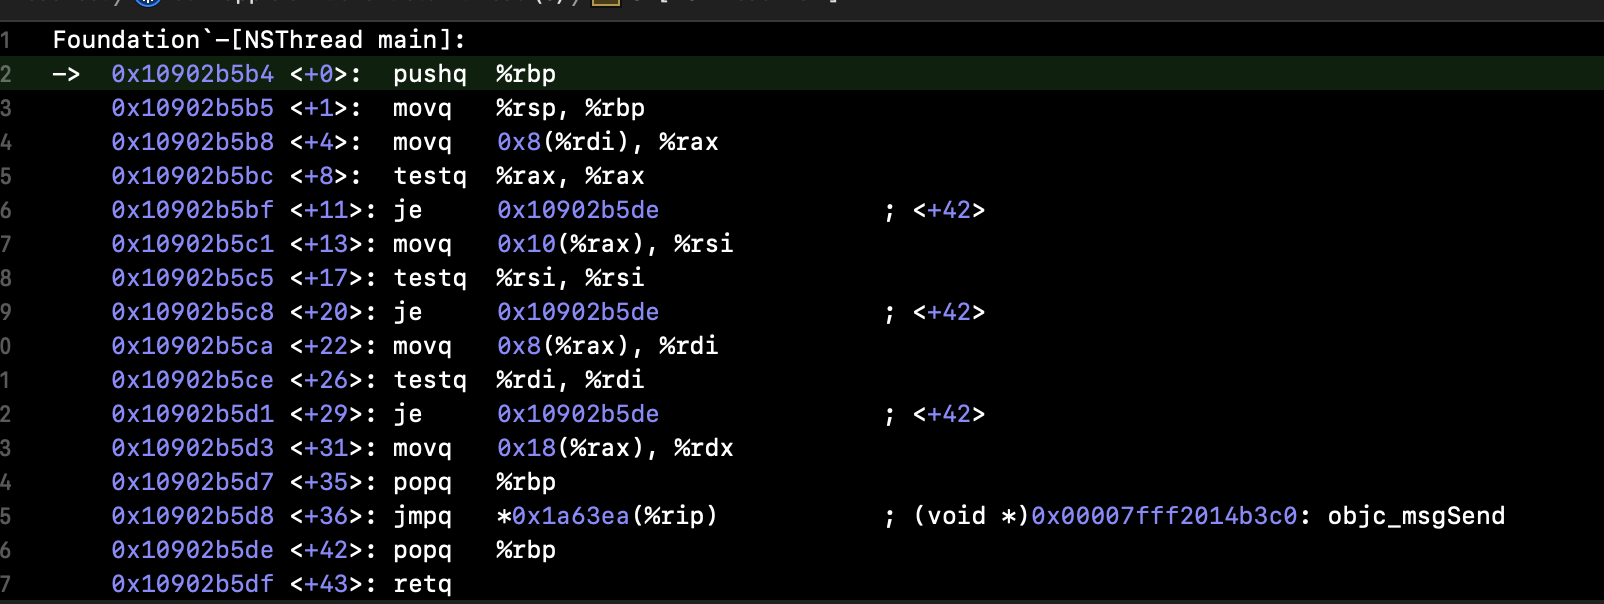
然后来到main方法中,执行target的selector方法。
结论:NSThread 和 pthread是一一对应的,NSThread是pthread的一层抽象封装。
当然NSThread也可以设置线程的名称、优先级以及判断线程是否是主线程等方法。
2、cancel和exit方法
例如下面代码:
@property (nonatomic, strong) NSThread *curThread;
.....
- (void)viewDidLoad {
    [super viewDidLoad];
    // Do any additional setup after loading the view.
    NSThread *thread = [[NSThread alloc] initWithTarget:self selector:@selector(test) object:nil];
    self.curThread = thread;
    [self.curThread start];
    dispatch_after(dispatch_time(DISPATCH_TIME_NOW,0.5*NSEC_PER_SEC), dispatch_get_main_queue(), ^{
        [self.curThread cancel];
    });
}

- (void)test {
    NSLog(@"任务开始");
    while (![NSThread currentThread].isCancelled) {
        NSLog(@"任务执行");
    }
    NSLog(@"任务结束");
}
当开启一条线程,然后延时0.5秒之后执行cancel方法时,通过判断[NSThread currentThread].isCancelled来停止循环,此时任务结束。
为了验证线程是否被销毁:
dispatch_after(dispatch_time(DISPATCH_TIME_NOW,1.0*NSEC_PER_SEC), dispatch_get_main_queue(), ^{
     [self performSelector:@selector(test) onThread:self.curThread withObject:nil waitUntilDone:false];
});
我延时1.0秒,继续在该线程执行test任务,结果并没有执行。这就证明,当线程任务执行完之后,线程就会销毁了。
为了不让线程在执行完任务之后销毁,我们将此线程的runloop开启,并且加入一个port,不让runloop退出:
- (void)test {
    [[NSRunLoop currentRunLoop] addPort:[NSPort port] forMode:NSDefaultRunLoopMode];
    NSLog(@"任务开始");
    while (![NSThread currentThread].isCancelled) {
        NSLog(@"任务执行");
    }
    NSLog(@"任务结束");
    [[NSRunLoop currentRunLoop] run];
}
此时线程会是一个常驻线程,也就不会退出了。
那么如何把一个常驻线程退出呢?需要通过 [NSThread exit];
dispatch_after(dispatch_time(DISPATCH_TIME_NOW,2.0*NSEC_PER_SEC), dispatch_get_main_queue(), ^{
        [self performSelector:@selector(test1) onThread:self.curThread withObject:nil waitUntilDone:false];
    });
......
- (void)test1 {
    [NSThread exit];
}
我继续延时2.0秒,执行该线程的test1任务,在任务中调用 [NSThread exit]。此时线程会被销毁,runloop也退出了。
或者通过移除Runloop中刚才添加的port,让Runloop先退出,然后线程会自动销毁。
当然也可以通过变量控制,这里会在探索Runloop的时候具体分析。
四、IOS - performSelector
1、NSObject中的performSelector
- (id)performSelector:(SEL)aSelector;
- (id)performSelector:(SEL)aSelector withObject:(id)object;
- (id)performSelector:(SEL)aSelector withObject:(id)object1 withObject:(id)object2;
//底层实现:
- (id)performSelector:(SEL)sel {
    if (!sel) [self doesNotRecognizeSelector:sel];
    return ((id(*)(id, SEL))objc_msgSend)(self, sel);
}
这3个performSelector方法其底层都是走的objc_msgSend,和我们直接调用一个方法没有区别。
2、NSThreadPerformAdditions分类
@interface NSObject (NSThreadPerformAdditions)

- (void)performSelectorOnMainThread:(SEL)aSelector withObject:(nullable id)arg waitUntilDone:(BOOL)wait modes:(nullable NSArray<NSString *> *)array;
- (void)performSelectorOnMainThread:(SEL)aSelector withObject:(nullable id)arg waitUntilDone:(BOOL)wait;
	// equivalent to the first method with kCFRunLoopCommonModes
// waitUntilDone设置为YES,会阻塞主线程,优先在子线程中执行方法,方法执行完后主线程再继续后面的打印
// waitUntilDone设置为NO,子线程的方法和主线程的打印同时进行
- (void)performSelector:(SEL)aSelector onThread:(NSThread *)thr withObject:(nullable id)arg waitUntilDone:(BOOL)wait modes:(nullable NSArray<NSString *> *)array API_AVAILABLE(macos(10.5), ios(2.0), watchos(2.0), tvos(9.0));
- (void)performSelector:(SEL)aSelector onThread:(NSThread *)thr withObject:(nullable id)arg waitUntilDone:(BOOL)wait API_AVAILABLE(macos(10.5), ios(2.0), watchos(2.0), tvos(9.0));
	// equivalent to the first method with kCFRunLoopCommonModes
- (void)performSelectorInBackground:(SEL)aSelector withObject:(nullable id)arg API_AVAILABLE(macos(10.5), ios(2.0), watchos(2.0), tvos(9.0));

@end
注意
(1)其中前4个方法,是在主线程或者开启子线程去执行任务,而performSelectorInBackground就是创建一个NSThread然后去start。这里就不具体的分析了。
(2)后3个方法(主线程/子线程->子线程),必须保证要执行事件的子线程开启RunLoop。
3、NSDelayedPerforming 分类
@interface NSObject (NSDelayedPerforming)

- (void)performSelector:(SEL)aSelector withObject:(nullable id)anArgument afterDelay:(NSTimeInterval)delay inModes:(NSArray<NSRunLoopMode> *)modes;
- (void)performSelector:(SEL)aSelector withObject:(nullable id)anArgument afterDelay:(NSTimeInterval)delay;
+ (void)cancelPreviousPerformRequestsWithTarget:(id)aTarget selector:(SEL)aSelector object:(nullable id)anArgument;
+ (void)cancelPreviousPerformRequestsWithTarget:(id)aTarget;

@end
这个分类同时提供了延时和取消的方法,但是有一点需要注意:
它是基于runloop中的timer的,如果在子线程中使用的话,需要手动开启runloop,否则不会执行。
4、NSRunloop的扩展
@interface NSRunLoop (NSOrderedPerform)

- (void)performSelector:(SEL)aSelector target:(id)target argument:(nullable id)arg order:(NSUInteger)order modes:(NSArray<NSRunLoopMode> *)modes;
- (void)cancelPerformSelector:(SEL)aSelector target:(id)target argument:(nullable id)arg;
- (void)cancelPerformSelectorsWithTarget:(id)target;

@end
这个方法很少在项目中用到,但是功能我感觉是真的强大,它可以根据order来控制执行的顺序。因为它是基于Runloop的observer回调,所以在子线程中需要开启Runloop。
- (void)viewDidLoad {
    [super viewDidLoad];
    // Do any additional setup after loading the view.
    _port1 = [NSPort port];
    NSThread *thread = [[NSThread alloc] initWithTarget:self selector:@selector(test) object:nil];
    thread.name = @"custom thread";
    [thread start];
    /*
    dispatch_queue_t q = dispatch_queue_create("xxxx", DISPATCH_QUEUE_CONCURRENT);
    dispatch_async(q, ^{
        [self test];
    });
     */
}

- (void)test {

    [[NSRunLoop currentRunLoop] addPort:_port1 forMode:NSRunLoopCommonModes];
    [[NSRunLoop currentRunLoop] performSelector:@selector(test1) target:self argument:nil order:1 modes:@[NSRunLoopCommonModes]];
    [[NSRunLoop currentRunLoop] performSelector:@selector(test4) target:self argument:nil order:4 modes:@[NSRunLoopCommonModes]];
    [[NSRunLoop currentRunLoop] performSelector:@selector(test3) target:self argument:nil order:3 modes:@[NSRunLoopCommonModes]];
    [[NSRunLoop currentRunLoop] performSelector:@selector(test2) target:self argument:nil order:2 modes:@[NSRunLoopCommonModes]];
    /*
    //或者:让runloop只跑一次
    [[NSRunLoop currentRunLoop] runUntilDate:[NSDate distantPast]];
    */
    [self performSelector:@selector(cancel) withObject:nil afterDelay:1];
    [[NSRunLoop currentRunLoop] run];
}

- (void)test1 {
    NSLog(@"1");
}

- (void)test2 {
    NSLog(@"2");
}

- (void)test3 {
    NSLog(@"3");
}
- (void)test4 {
    NSLog(@"4");
}

- (void)test6 {
    NSLog(@"===");
}

- (void)cancel {

    [[NSRunLoop currentRunLoop] removePort:_port1 forMode:NSRunLoopCommonModes];
    /*
     如果是用gcd开启的线程,这里exit会崩溃。(EXC_BAD_INSTRUCTION )
     [NSThread exit];
     */
}
打印顺序为 1 2 3 4。同样的如果在子线程中执行,需要开启runloop,并保持事件循环。注意必要时需要退出线程(通过移除port,退出runloop)。
五、常用的多线程方案
IOS最常用的多线程方案就是GCD和NSOperation&NSOperationQueue了。
这个两个方案后面会具体进行分析。