IOS - 静态库与动态库(2)
前言
一、区分 import "" 和 import <>
二、动态库链接
三、tdb格式文件
四、编译动态库framework
五、dyld: Libraray not Loaded @rpath 和 image not found 的原因。
六、rpath
七、@executable_path
八、@loader_path
九、re-export
通过对静态库的分析之后,继续来探索动态库。
一、区分 import "" 和 import <>
对于系统库来说,我们在import的时候需要,比如 import <UIkit/UIkit.h>。
对于本地文件来说,我们只需要 import ""
那么我用cocoapod, install一个AFNetworking,那么使用以下4种方式,都能引用到它的头文件。
#import "AFNetworking.h"
#import "AFNetworking/AFNetworking.h"
#import <AFNetworking/AFNetworking.h>
#import <AFNetworking.h>
那么此时 "" 和 <> 的区别是什么呢?
我们可以看到在build setting中,Header Search Paths默认添加了pod中AFNetworking的路径,所以此时以上4种方法都不会报错,因为在Header Search Paths中添加的库文件路径,可以使用""和<>两种方式引用。
那么我如果去掉Header Search Paths中AFNetworking的路径时,只能通过
#import "AFNetworking/AFNetworking.h"
#import <AFNetworking/AFNetworking.h>
这两种方式引用,因为需要指定头文件是在哪一个库文件中,这两种方式都指定了,所以不会报错。
当我们在User Header Search Paths 添加了AFNetworking的库文件路径,此时会支持
#import "AFNetworking.h"
因为User Header Search Paths 只支持 import "xxx.h"的方式。
总结:
1、在Header Search Paths中添加库文件路径时,支持所有方式。
2、只在User Header Search Paths中添加库文件路径时,只支持 ""的方法。
3、不在Header Search Paths和User Header Search Paths中添加库文件路径时,只支持 import "xxx/xxx.h" 和 import <xxx/xxx.h>的方式。
二、动态库链接
#import <Foundation/Foundation.h>
#import <AFNetworking.h>
int main(){
    AFHTTPSessionManager *manager = [AFHTTPSessionManager manager];
    NSLog(@"testApp----%@", manager);
    return 0;
}
首先创建一个test.m文件,通过命令生成.o,我们通过ios14.5模拟器的sdk来生成
clang -target x86_64-apple-ios14.5-simulator \
-fobjc-arc \
-isysroot /Applications/Xcode.app/Contents/Developer/Platforms/iPhoneSimulator.platform/Developer/SDKs/iPhoneSimulator14.5.sdk \
-I./AFNetworking \
-c test.m -o test.o
开始链接动态库
clang -target x86_64-apple-ios14.5-simulator \
-fobjc-arc \
-isysroot /Applications/Xcode.app/Contents/Developer/Platforms/iPhoneSimulator.platform/Developer/SDKs/iPhoneSimulator14.5.sdk \
-L./AFNetworking \
-lAfNetworking \
test.o -o test
此时通过lldb,进行调试,不像静态库一样,会直接运行成功,而是会直接报错:
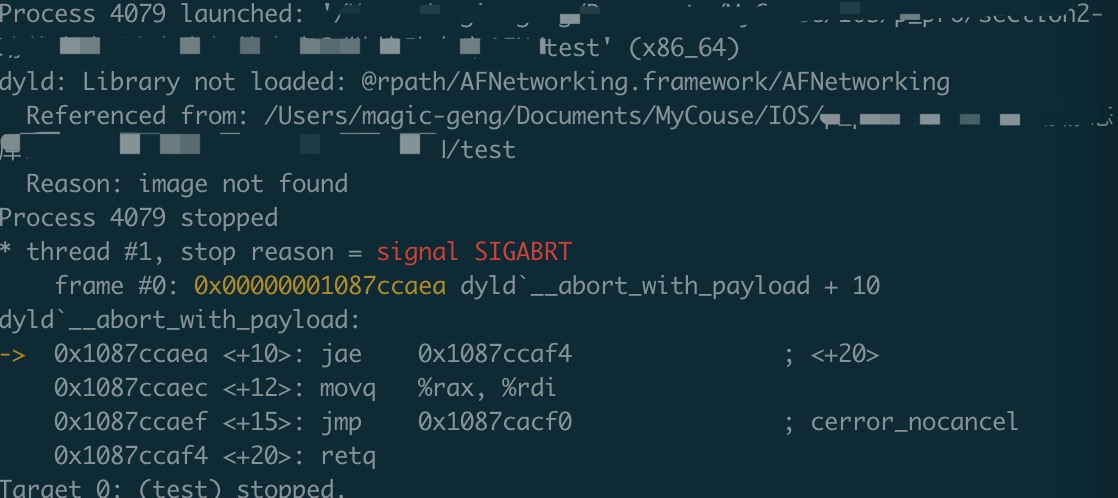
dyld: Libraray not Loaded @rpath 和 image not found
根据报错继续来探索,准备好要测试的文件:
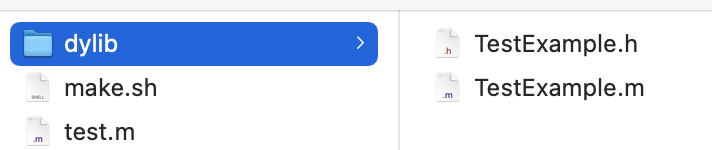
编写简单的脚本make.sh
#生成.o文件
echo "编译test.m -> test.o"
clang -target x86_64-apple-ios14.5-simulator \
-fobjc-arc \
-isysroot /Applications/Xcode.app/Contents/Developer/Platforms/iPhoneSimulator.platform/Developer/SDKs/iPhoneSimulator14.5.sdk \
-I./dylib \
-c test.m -o test.o

#进入到dylib目录
pushd ./dylib

echo "编译TestExample.m -> TestExample.o"

#生成.o文件
clang -target x86_64-apple-ios14.5-simulator \
-fobjc-arc \
-isysroot /Applications/Xcode.app/Contents/Developer/Platforms/iPhoneSimulator.platform/Developer/SDKs/iPhoneSimulator14.5.sdk \
-c TestExample.m -o TestExample.o

echo "编译TestExample.o -> libTestExample.dylib"

#生成动态库
clang -dynamiclib \
-target x86_64-apple-ios14.5-simulator \
-fobjc-arc \
-isysroot /Applications/Xcode.app/Contents/Developer/Platforms/iPhoneSimulator.platform/Developer/SDKs/iPhoneSimulator14.5.sdk \
TestExample.o -o libTestExample.dylib

popd

echo "链接libTestExample.dylib"

#链接libTestExample.dylib
clang -target x86_64-apple-ios14.5-simulator \
-fobjc-arc \
-isysroot /Applications/Xcode.app/Contents/Developer/Platforms/iPhoneSimulator.platform/Developer/SDKs/iPhoneSimulator14.5.sdk \
-L./dylib \
-lTestExample \
test.o -o test
执行完脚本,生成test EXEC,通过lldb运行,仍然报了之前的错误:dyld: Libraray not Loaded @rpath 和 image not found
在探索静态库的时候,可以完美的运行,为什么动态库就报错了呢?因此我们需要知道动态库的原理。
静态库是.o文件的合集,那么动态库也可以通过静态库来生成。
修改一下脚本文件:
#生成.o文件

echo "编译test.m -> test.o"

clang -target x86_64-apple-ios14.5-simulator \
-fobjc-arc \
-isysroot /Applications/Xcode.app/Contents/Developer/Platforms/iPhoneSimulator.platform/Developer/SDKs/iPhoneSimulator14.5.sdk \
-I./dylib \
-c test.m -o test.o

#进入到dylib目录
pushd ./dylib

echo "编译TestExample.m -> TestExample.o"

#生成.o文件
clang -target x86_64-apple-ios14.5-simulator \
-fobjc-arc \
-isysroot /Applications/Xcode.app/Contents/Developer/Platforms/iPhoneSimulator.platform/Developer/SDKs/iPhoneSimulator14.5.sdk \
-c TestExample.m -o TestExample.o


echo "编译TestExample.o -> libTestExample.a"
#相比ar命令更贴合实际使用
libtool -static -arch_only x86_64 TestExample.o -o libTestExample.a

#通过链接器生成动态库 # macosx_version_min 11.1
echo "链接libTestExample.a生成动态库"
ld -dylib -arch x86_64 \
-ios_version_min 11.1 \
-syslibroot /Applications/Xcode.app/Contents/Developer/Platforms/iPhoneSimulator.platform/Developer/SDKs/iPhoneSimulator14.5.sdk \
-lsystem -framework Foundation \
libTestExample.a -o libTestExample.dylib

popd

echo "链接libTestExample.dylib"

#链接libTestExample.dylib
clang -target x86_64-apple-ios14.5-simulator \
-fobjc-arc \
-isysroot /Applications/Xcode.app/Contents/Developer/Platforms/iPhoneSimulator.platform/Developer/SDKs/iPhoneSimulator14.5.sdk \
-L./dylib \
-lTestExample \
test.o -o test
执行脚本,又报错:

可以看到找不到_OBJC_CLASS_$_TestExample导出符号。
通过 objdump --macho --exports-trie libTestExample.dylib 查看导出符号:

可以看到导出符号是空的,什么都没有,不报错才怪啊。
原因是因为,在通过静态库链接动态库的过程中,链接器默认参数是-noall_load,会把没有用到的代码给剥离掉,所以导出符号是空的。我们在ld 命令增加 -all_load,就可以解决了。
通过静态库链接成动态库,可以总结一下:静态库只是.o文件的合集,而动态库是.o文件链接过后的产物,也就是动态库是最终链接的产物。所以动态库是不能合并的。
三、tdb格式文件
我们通过-L(指定库文件目录)、 -l (指定库文件名称)或者 -F (指定framwork目录)、-f(指定framework名称)本质上是告诉链接器导出符号在哪个位置。
通过tdb格式文件我们就可以验证:
tdb全称:test-based stub libraries,本质就是一个YAML描述的文本文件。
他的作用是记录动态库的一些信息,包括导出的符号、动态库的架构信息、动态库的依赖信息。
用户避免在真机开发过程中直接使用传统的dylib。
对于真机来说,由于动态库都是在设备上,在xcode上使用基于tbd格式的伪framework可以大大减少xcode的大小。
我们随便在一个demo中导入一个tdb文件: ACIPCBTLib.tbd
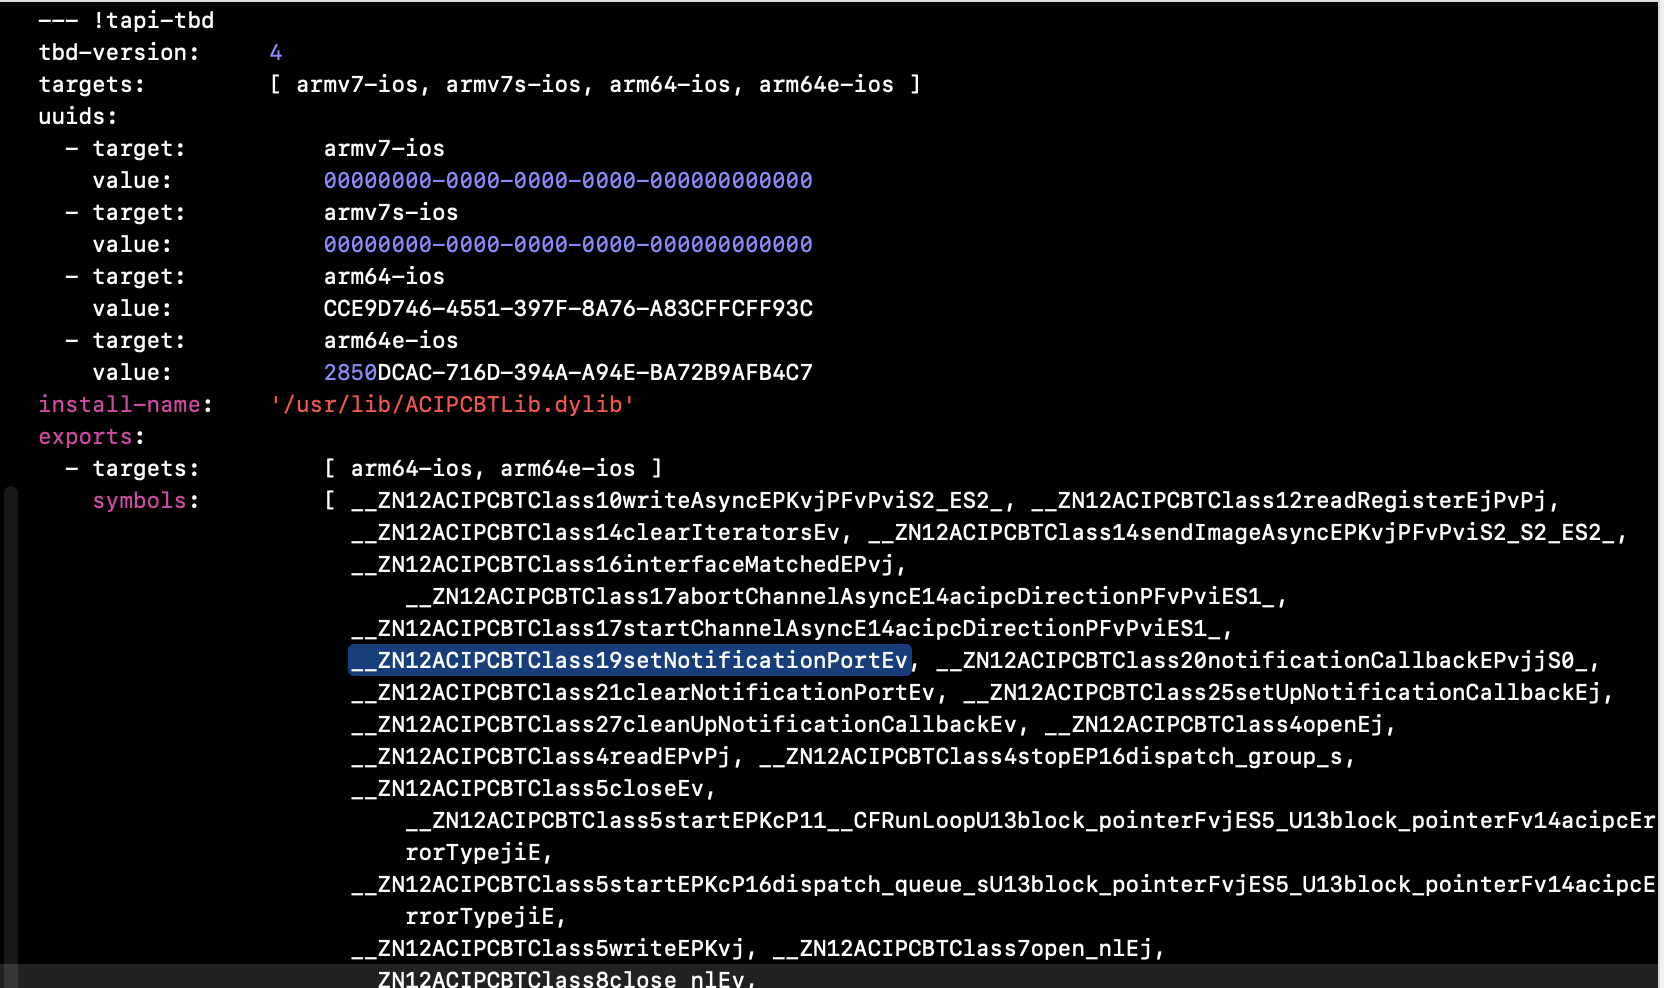
可以看到, ACIPCBTLib.tbd中记录了动态库的信息和导出符号。等到真正运行在真机上的时候,会通过tdb记录的信息去指向真机中实际上存在的动态库,然后加载。
四、编译动态库framework
首先准备好测试文件:

然后现在TestExample.framework 执行脚本 ./build.sh
#编译生成TestExample.m -> TestExample.o
clang -target x86_64-apple-macos11.3 \
-fobjc-arc \
-isysroot /Applications/Xcode.app/Contents/Developer/Platforms/MacOSX.platform/Developer/SDKs/MacOSX11.3.sdk \
-I./Headers \
-c TestExample.m -o TestExample.o

#链接生成TestExample动态库
ld -dylib -arch x86_64 \
-macos_version_min 11.3 \
-syslibroot /Applications/Xcode.app/Contents/Developer/Platforms/MacOSX.platform/Developer/SDKs/MacOSX11.3.sdk \
-lsystem -framework Foundation \
TestExample.o -o TestExample
然后回到test.m的目录,执行脚本./build.sh
#编译生成test.m -> test.o
clang -target x86_64-apple-macos11.3 \
-fobjc-arc \
-isysroot /Applications/Xcode.app/Contents/Developer/Platforms/MacOSX.platform/Developer/SDKs/MacOSX11.3.sdk \
-I./Frameworks/TestExample.framework/Headers \
-c test.m -o test.o
#链接动态库
clang   \
-target x86_64-apple-macos11.3 \
-fobjc-arc \
-isysroot /Applications/Xcode.app/Contents/Developer/Platforms/MacOSX.platform/Developer/SDKs/MacOSX11.3.sdk \
-F./Frameworks \
-framework TestExample \
test.o -o test
此时,以及编译生成动态库的framework,并且链接成功,我们再通过lldb运行一下,依然报错:dyld: Libraray not Loaded @rpath 和 image not found。
五、dyld: Libraray not Loaded @rpath 和 image not found 的原因。
通过以上链接一个dylib动态库和framework动态库,最终运行都会报同一个错误,那么我们就来分析一下这个错误到底是什么原因。
首先先来看一张流程图:
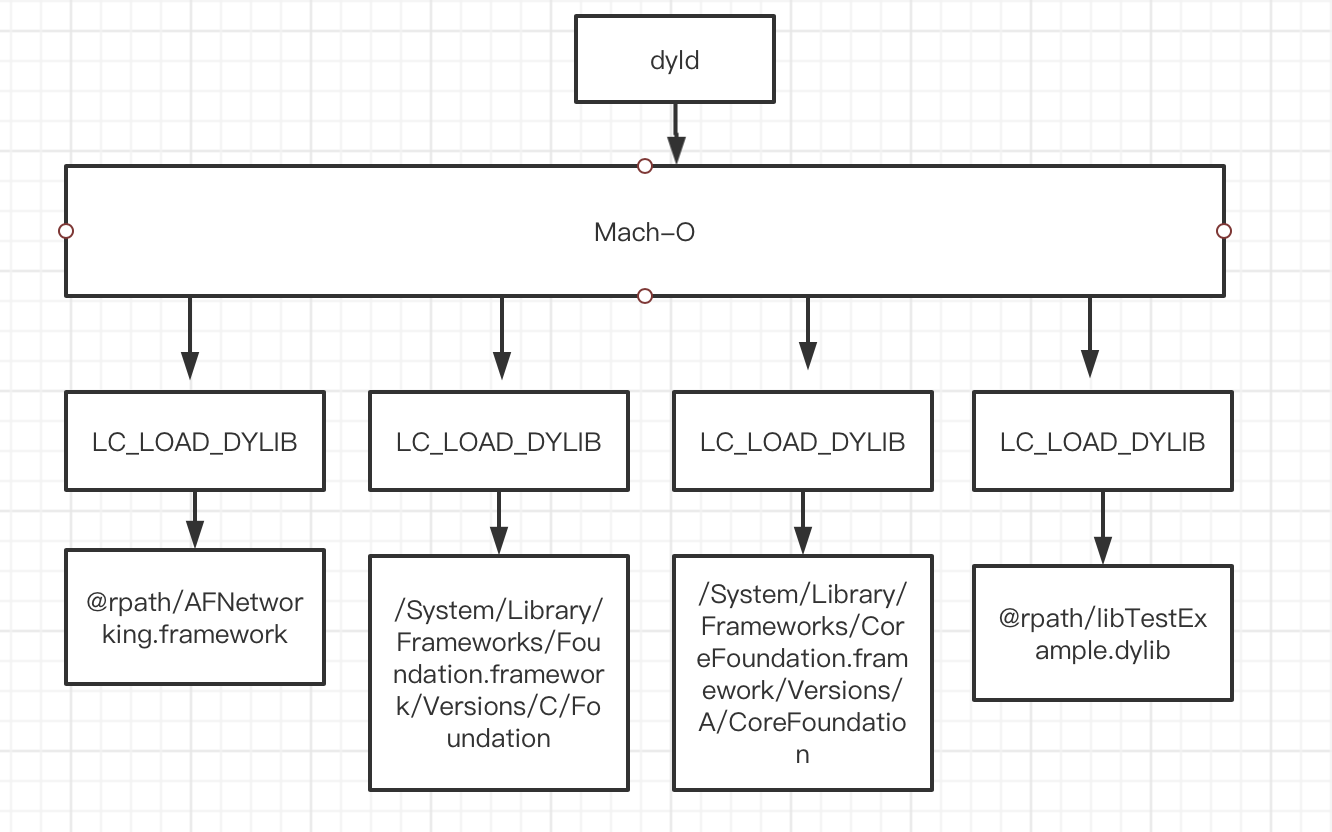
dyld在加载Mach-O的时候,会去加载LC_LOAD_DYLIB,LC_LOAD_DYLIB这里面保存了动态库的路径,dyld会通过路径去找到对应的动态库。
那么通过报错可以知道,报错的根本原因就是没有找到动态库的路径。
我们通过 otool -l test | grep 'DYLIB' -A 5 (-A 向下查找 5个) 命令查看test使用了多个动态库
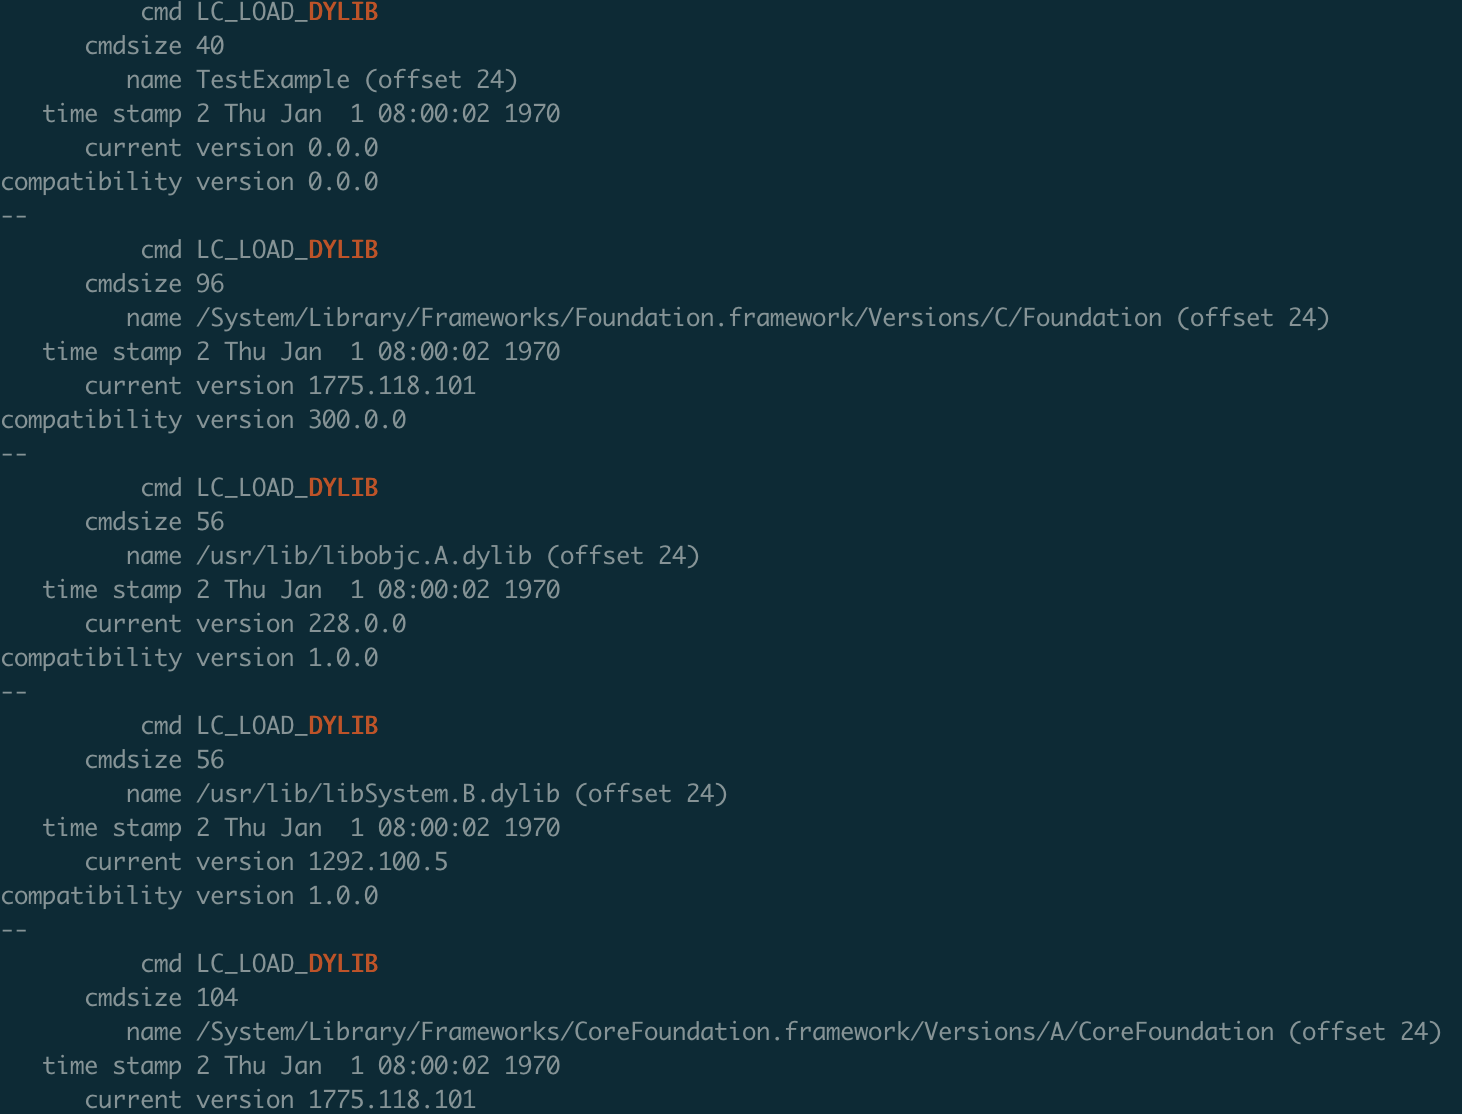
可以看到,test总共使用了5个动态库。
显然 name TestExample,只有一个名称,并不是一个路径,所以才会报image not found的错误。
既然test可执行文件中,并没有正确的指向TestExample动态库的路径,那么我们就给它指定正确的路径。
首先理解:动态库的路径是保存在自己的macho文件中的(在LC_ID_DYLIB中),并不是链接它的可执行文件的macho中的。
通过命令: otool -l TestExample | grep 'ID' -A 5
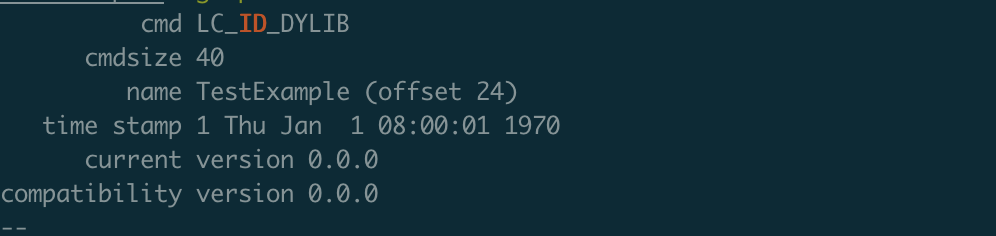
可以看到,name对应的路径为TestExample,也就是在生成TestExample动态库时,路径就没有给对。
通过命令: install_name_tool -id xxxx TestExample 修改TestExample的路径。
再通过otool查看:
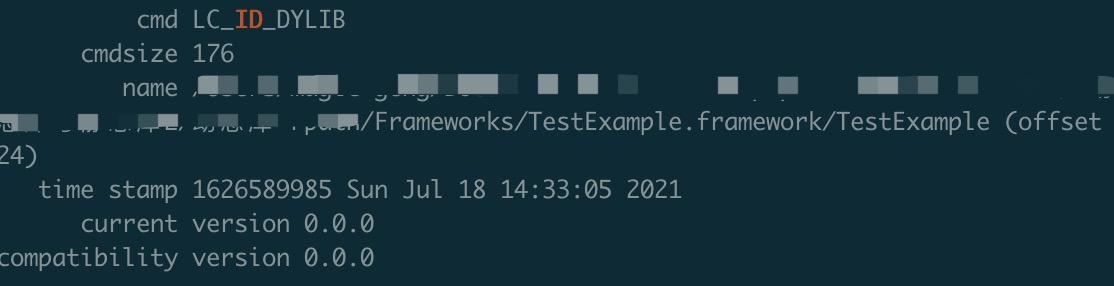
可以看到LC_ID_DYLIB中的name被修改成了绝对路径。
然后此时我们再链接TestExample动态库,然后再看一下test可执行文件中对应的LC_LOAD_DYLIB对应的name,也变成了绝对路径。
最后通过lldb运行,就不会不错了。
总结:在test链接动态库的时候,会从动态库中获取到动态库的路径,然后保存到自己的macho中,在动态加载的时候,会通过对应的路径从而加载动态库。
六、rpath
通过修改绝对路径是能解决问题,但是对于不同的动态库,不同的项目而言,不可能每次都要使用绝对路径的。此时就用到了rpath。
@rpath:Runpath search Paths 是dyld搜索路径.
简单的来说就是谁链接动态库,rpath就谁来提供。比如test链接TestExample动态库,那么rpath就代表test当前的目录路径。
我们修改一下动态库脚本中的ld命令,增加一个-install_name @rpath/Frameworks/TestExample.framework/TestExample
ld -dylib -arch x86_64 \
-macos_version_min 11.3 \
-syslibroot /Applications/Xcode.app/Contents/Developer/Platforms/MacOSX.platform/Developer/SDKs/MacOSX11.3.sdk \
-lsystem -framework Foundation \
-install_name @rpath/Frameworks/TestExample.framework/TestExample \
TestExample.o -o TestExample
那么@rpath是应该test来提供。先来看下test中的RPATH,通过otool -l test | grep 'RPATH' -A 5 -i (-i是大小写不敏感) 查看rpath,发现并没有,此时链接动态库的时候,仍然找不到动态库。
所以我们就来给他test添加一个rpath。
通过命令: install_name_tool -add_rpath xxxx test
此时再查看test中的RPATH,已经添加了。再lldb运行,成功。
七、@executable_path
表示可执行程序所在的目录,会解析为可执行文件的绝对路径。
由于我们刚才设置的rpath也是一个绝对路径,这个显然是不合理,所以我们通过系统提供的@executable_path来修改一下rpath。
通过命令: install_name_tool -rpath xxx(old) xxx(new) test 来修改test的rpath

通过lldb运行,成功。
八、@loader_path
表示'谁'链接'Mach-O',就代表'谁'的所在目录,比如test链接TestExample动态库,那么@loader_path,就是test的所在目录。
那么在链接TestExample时,loader_path 确实 等于 executable_path。好像没有什么特别的作用。
再另外一个场景下,loader_path就会发挥它的作用了。
比如一个动态库链接另外一个动态库的场景:test去链接TestExample,而TestExample又链接了另外一个动态库TestExampleLog。
首先进入TestExampleLog.framework ,编写脚本
#编译TestExampleLog.m -> TestExampleLog.o

clang -target x86_64-apple-macos11.3 \
-fobjc-arc \
-isysroot /Applications/Xcode.app/Contents/Developer/Platforms/MacOSX.platform/Developer/SDKs/MacOSX11.3.sdk \
-I./Headers \
-c TestExampleLog.m -o TestExampleLog.o

#编译TestExampleLog.o -> TestExampleLog动态库,并指定@rpath

clang -dynamiclib  \
-target x86_64-apple-macos11.3 \
-fobjc-arc \
-isysroot /Applications/Xcode.app/Contents/Developer/Platforms/MacOSX.platform/Developer/SDKs/MacOSX11.3.sdk \
-Xlinker -install_name -Xlinker @rpath/TestExampleLog.framework/TestExampleLog \
TestExampleLog.o -o TestExampleLog

#查看 TestExampleLog 中的DYLIB 和 RPATH
otool -l TestExampleLog | grep 'DYLIB' -A 5
otool -l TestExampleLog | grep 'ID' -A 5
然后回到TestExample目录下,编写脚本
#编译TestExample.m -> TestExample.o
clang -target x86_64-apple-macos11.3 \
-fobjc-arc \
-isysroot /Applications/Xcode.app/Contents/Developer/Platforms/MacOSX.platform/Developer/SDKs/MacOSX11.3.sdk \
-I./Headers \
-I./Frameworks/TestExampleLog.framework/Headers \
-c TestExample.m -o TestExample.o

#链接TestExampleLog动态库,编译动态库,并指定rpath
clang -dynamiclib  \
-target x86_64-apple-macos11.3 \
-fobjc-arc \
-isysroot /Applications/Xcode.app/Contents/Developer/Platforms/MacOSX.platform/Developer/SDKs/MacOSX11.3.sdk \
-Xlinker -install_name -Xlinker @rpath/TestExample.framework/TestExample \
-F./Frameworks \
-framework TestExampleLog \
TestExample.o -o TestExample

echo "-------DYLIB---------"
otool -l TestExample | grep 'DYLIB' -A 5
最后回到test目录,编写脚本:
#编译test.m -> test.o
clang -target x86_64-apple-macos11.3 \
-fobjc-arc \
-isysroot /Applications/Xcode.app/Contents/Developer/Platforms/MacOSX.platform/Developer/SDKs/MacOSX11.3.sdk \
-I./Frameworks/TestExample.framework/Headers \
-c test.m -o test.o

#链接TestExample,指定rpath=@executable_path/Frameworks,生成可执行文件
clang   \
-target x86_64-apple-macos11.3 \
-fobjc-arc \
-isysroot /Applications/Xcode.app/Contents/Developer/Platforms/MacOSX.platform/Developer/SDKs/MacOSX11.3.sdk \
-Xlinker -rpath -Xlinker @executable_path/Frameworks \
-F./Frameworks \
-framework TestExample \
test.o -o test

otool -l test | grep 'RPATH' -A 3
otool -l test | grep 'DYLIB' -A 3
此时,我们通过lldb运行:

可以看到,没有找到TestExampleLog动态库。
那么没有找到的原因就是,rpath就是谁链接动态库,就是谁提供,那么显然是TextExample链接了TestExampleLog,所以应该是TextExample提供,修改TextExample脚本:
#链接TestExampleLog动态库,编译动态库,并指定rpath
clang -dynamiclib  \
-target x86_64-apple-macos11.3 \
-fobjc-arc \
-isysroot /Applications/Xcode.app/Contents/Developer/Platforms/MacOSX.platform/Developer/SDKs/MacOSX11.3.sdk \
-Xlinker -install_name -Xlinker @rpath/TestExample.framework/TestExample \
-Xlinker -rpath -Xlinker @executable_path/Frameworks/TestExample.framework/Frameworks \
-F./Frameworks \
-framework TestExampleLog \
TestExample.o -o TestExample
其中给TextExampleLog提供的rpath,由于@executable_path 是表示可执行程序所在的目录,所以需要拼接成 @executable_path/Frameworks/TestExample.framework/Frameworks。
那么这里拼接的路径很长,此时就可以用到@loader_path (谁链接动态库,就代码是谁的所在目录),继续修改TextExample脚本:
#链接TestExampleLog动态库,编译动态库,并指定rpath
clang -dynamiclib  \
-target x86_64-apple-macos11.3 \
-fobjc-arc \
-isysroot /Applications/Xcode.app/Contents/Developer/Platforms/MacOSX.platform/Developer/SDKs/MacOSX11.3.sdk \
-Xlinker -install_name -Xlinker @rpath/TestExample.framework/TestExample \
-Xlinker -rpath -Xlinker @loader_path/Frameworks \
-F./Frameworks \
-framework TestExampleLog \
TestExample.o -o TestExample
最终编译,lldb运行,成功。
那么在我们的xcode->build setting中同样存在@rpath这个配置

了解了rpath之后,我们其实可以修改其他软件的rpath,指定为我们自己同名的动态库,这也是一种破解手段,在修改之后,我们需要执行 code sign --force --deep --sign 命令。因为只有签名过的库,苹果才会校验通过。关于逆向的知识,未来会具体分析。
九、re-export
通过对rpath 、executable_path 以及loader_path的了解之后,我们可以在test中去调用TestExample的方法,TestExample又可以去调用TestExampleLog的方法,那么如何让test可以直接调用TestExampleLog中的方法呢?
如果要让test直接能调用TestExampleLog,那么TestExampleLog必须将导出符号保存在TestExample的可执行文件中,我们通过objdump --macho --exports-trie TestExample 查看一下导出符号:

发现并没有关于TestExampleLog的导出符号。
那么可以暴力一些,直接让test也链接TestExampleLog,这样也可以,但是这样做的话会比较混乱。
此时就需要重新导出符号,修改TestExample脚本:
#链接TestExampleLog动态库,编译动态库,并指定rpath,同时指定重新导出符号
clang -dynamiclib  \
-target x86_64-apple-macos11.3 \
-fobjc-arc \
-isysroot /Applications/Xcode.app/Contents/Developer/Platforms/MacOSX.platform/Developer/SDKs/MacOSX11.3.sdk \
-Xlinker -install_name -Xlinker @rpath/TestExample.framework/TestExample \
-Xlinker -rpath -Xlinker @loader_path/Frameworks \
-Xlinker -reexport_framework -Xlinker TestExampleLog \
-F./Frameworks \
-framework TestExampleLog \
TestExample.o -o TestExample
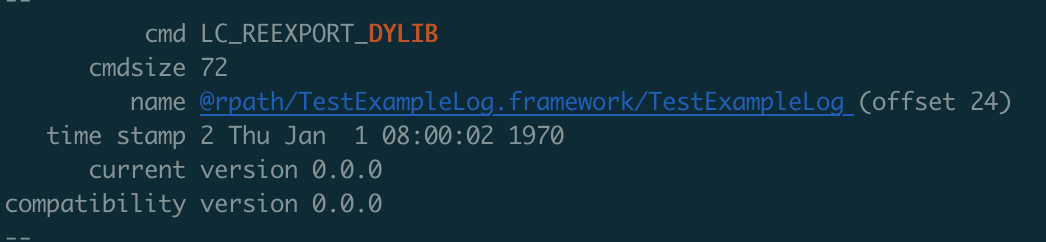
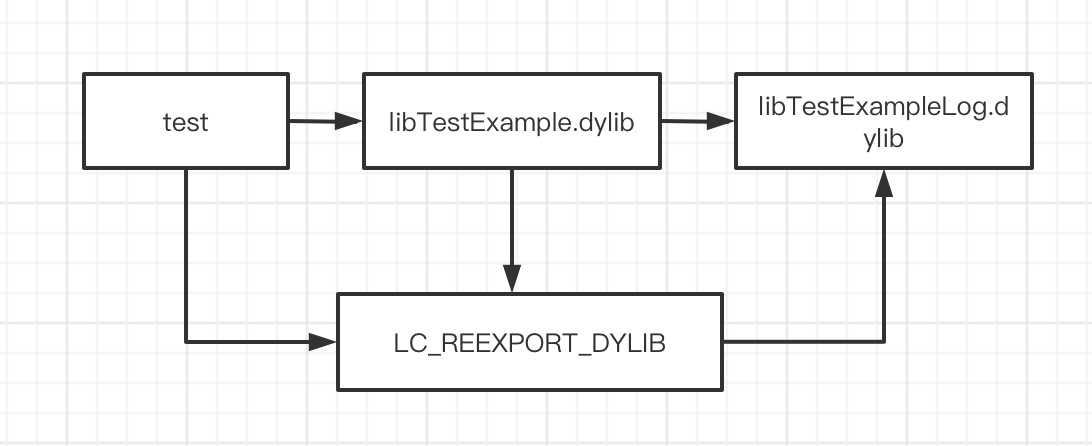
我们可以看到,在TestExample中,多出了一个LC_REEXPORT_DYLIB。这就意味着test在链接TestExample的时候可以通过TestExample中保存的LC_REEXPORT_DYLIB这个Load Command去找到TestExampleLog动态库。
如关系图:
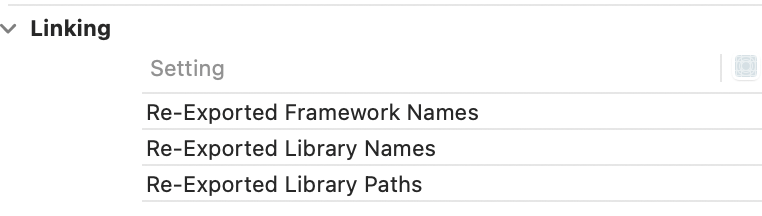
xcode->build setting中同样可以配置:
接下来回到test所在目录,修改脚本,添加TestExampleLog的头文件目录
clang -target x86_64-apple-macos11.3 \
-fobjc-arc \
-isysroot /Applications/Xcode.app/Contents/Developer/Platforms/MacOSX.platform/Developer/SDKs/MacOSX11.3.sdk \
-I./Frameworks/TestExample.framework/Headers \
-I./Frameworks/TestExample.framework/Frameworks/TestExampleLog.framework/Headers \
-c test.m -o test.o
然后在test.m中添加TestExampleLog.h头文件,并使用方法。
编译,然后lldb运行,完美成功!
补充:
1、静态库编译成动态库时的优化
在静态库中的全局符号,可以通过 ld -hidden-lx 命令去把全局符号隐藏掉,这样就可以在生成动态库的时候,不会变成导出符号,从而减小体积。那么这个探索,未来会具体分析。
2、比如在xcode中设置最低版本为ios13,那么如果引用了一个最低版本为ios14的动态库,系统会默认设置成弱引用。这样的好处就是,如果在ios13的手机上去运行这个动态库,就不会报错。