OC底层 - 类的加载(2)
前言
一、realizeClassWithoutSwift
二、methodizeClass
三、懒加载类和非懒加载类
四、分类的本质
五、classProperties
通过对objc_init的分析以及map_images->_read_images->readClass这几个核心函数的初识之后,我们可以清晰的知道从dyld的启动加载->objc_init->_dyld_objc_notify_register,到把类从macho里面加载到内存的过程。但是类的属性、方法、协议等是怎么读取到rw和ro里面呢?带着还未解决的问题,我们继续来分析类的加载。
一、realizeClassWithoutSwift
回顾read_images中的核心方法 , 我们主要研究自定义的MyClassTest类:
// Category discovery MUST BE Late to avoid potential races
    // when other threads call the new category code before
    // this thread finishes its fixups.

    // +load handled by prepare_load_methods()

    // Realize non-lazy classes (for +load methods and static instances)
    for (EACH_HEADER) {
        classref_t const *classlist = hi->nlclslist(&count); //对应macho __objc_nlclslist
        for (i = 0; i < count; i++) {
             //classref_t 在启动时未修复; 使用 remapClass() 进行转换
            Class cls = remapClass(classlist[i]);

            const char *mangleName = cls->mangledName();
            const char *MyClassTest = "MyClassTest";
            if (strcmp(mangleName, MyClassTest) == 0) {
                auto ro = (const class_ro_t *)cls->data();
                auto isMeta = ro->flags & RO_META;
                if (isMeta) {
                    printf("classLoad Meta - nlclslist->_getObjc2NonlazyClassList: %s\n",MyClassTest);
                } else {
                    printf("classLoad noMeta - nlclslist->_getObjc2NonlazyClassList: %s\n",MyClassTest);
                }
            }

            if (!cls) continue;
            //将一个类添加到所有类的表中。这个表就是runtime_init的时候创建的
            addClassTableEntry(cls);

            if (cls->isSwiftStable()) {
                if (cls->swiftMetadataInitializer()) {
                    _objc_fatal("Swift class %s with a metadata initializer "
                                "is not allowed to be non-lazy",
                                cls->nameForLogging());
                }
                // fixme also disallow relocatable classes
                // We can't disallow all Swift classes because of
                // classes like Swift.__EmptyArrayStorage
            }
            realizeClassWithoutSwift(cls, nil);
        }
    }

    ts.log("IMAGE TIMES: realize non-lazy classes");
  // Realize newly-resolved future classes, in case CF manipulates them
    if (resolvedFutureClasses) {
        for (i = 0; i < resolvedFutureClassCount; i++) {
            Class cls = resolvedFutureClasses[i];
            if (cls->isSwiftStable()) {
                _objc_fatal("Swift class is not allowed to be future");
            }
            realizeClassWithoutSwift(cls, nil);
            cls->setInstancesRequireRawIsaRecursively(false/*inherited*/);

            const char *mangleName = cls->mangledName();
            const char *MyClassTest = "MyClassTest";
            if (strcmp(mangleName, MyClassTest) == 0) {
                printf("classLoad - resolvedFutureClasses: %s\n",MyClassTest);
            }
        }
        free(resolvedFutureClasses);
    }
if (DebugNonFragileIvars) {
        realizeAllClasses();
}
在read_images函数中,以上有3处都有实现class的函数: realizeClassWithoutSwift 和 realizeAllClasses。
在探索方法的慢速查找流程:lookUpImpOrForward ,当类没有初始化时,最终也会调用realizeClassWithoutSwift。
所以,我们先来具体的逐段分析一下realizeClassWithoutSwift函数。
 runtimeLock.assertLocked();
    class_rw_t *rw;
    Class supercls;
    Class metacls;
    const char *mangleName = cls->mangledName();
    const char *MyClassTest = "MyClassTest";
    if (strcmp(mangleName, MyClassTest) == 0) {
        auto ro = (const class_ro_t *)cls->data();
        auto isMeta = ro->flags & RO_META;
        if (isMeta) {
            printf("classLoad Meta - realizeClassWithoutSwift: %s\n",MyClassTest);
        } else {
            printf("classLoad noMeta - realizeClassWithoutSwift: %s\n",MyClassTest);
        }
    }
    if (!cls) return nil;
    if (cls->isRealized()) {
        validateAlreadyRealizedClass(cls);
        return cls;
    }
    ASSERT(cls == remapClass(cls));
    // fixme verify class is not in an un-dlopened part of the shared cache?
    //从macho中读取data,按照class_ro_t的格式强制转换成ro
    auto ro = (const class_ro_t *)cls->data();
可以看到核心的地方:auto ro = (const class_ro_t *)cls->data();
此时就是从macho中读取data,按照class_ro_t的格式强制转换成ro,那么我们来打印一下ro中的内容:
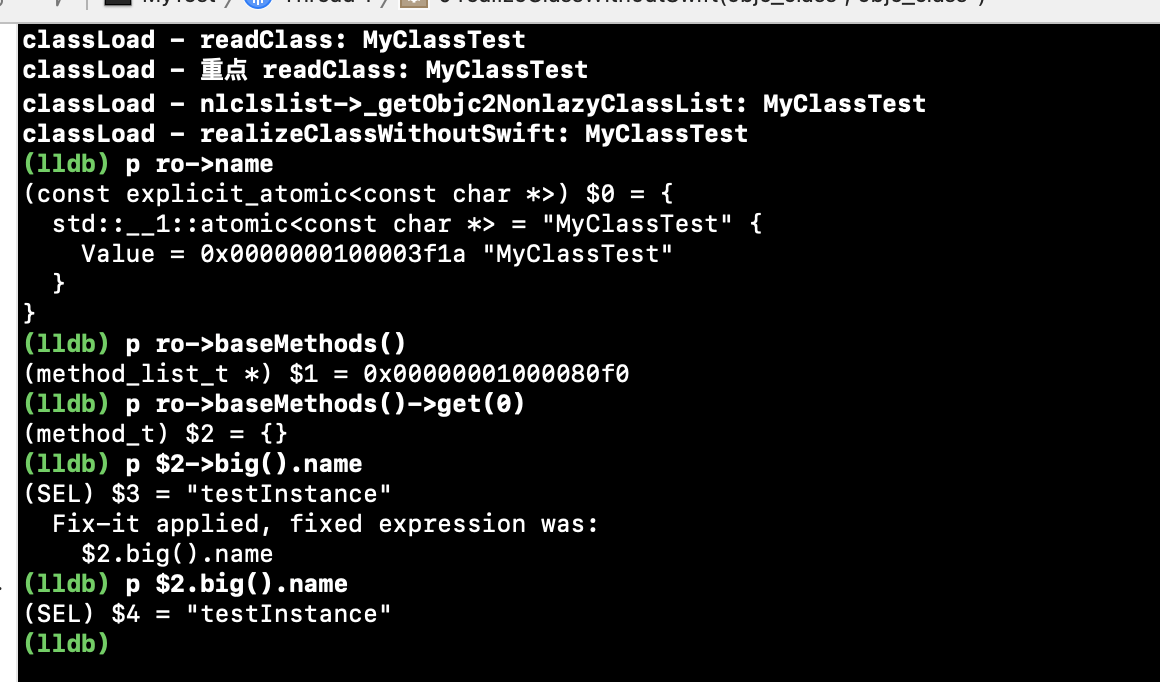
通过lldb,可以打印出我写在 MyClassTest 中的 testInstance的方法,那么属性,成员变量以及协议都可以打印出来。
继续:
auto isMeta = ro->flags & RO_META;
 if (ro->flags & RO_FUTURE) {
        // This was a future class. rw data is already allocated.
        rw = cls->data();
        ro = cls->data()->ro();
        ASSERT(!isMeta);
        cls->changeInfo(RW_REALIZED|RW_REALIZING, RW_FUTURE);
    } else {
        // Normal class. Allocate writeable class data.
        rw = objc::zalloc<class_rw_t>();
        rw->set_ro(ro);
        rw->flags = RW_REALIZED|RW_REALIZING|isMeta;
        cls->setData(rw);
    }
这段代码,一般会走else里面,因为if里是针对未来的判断。
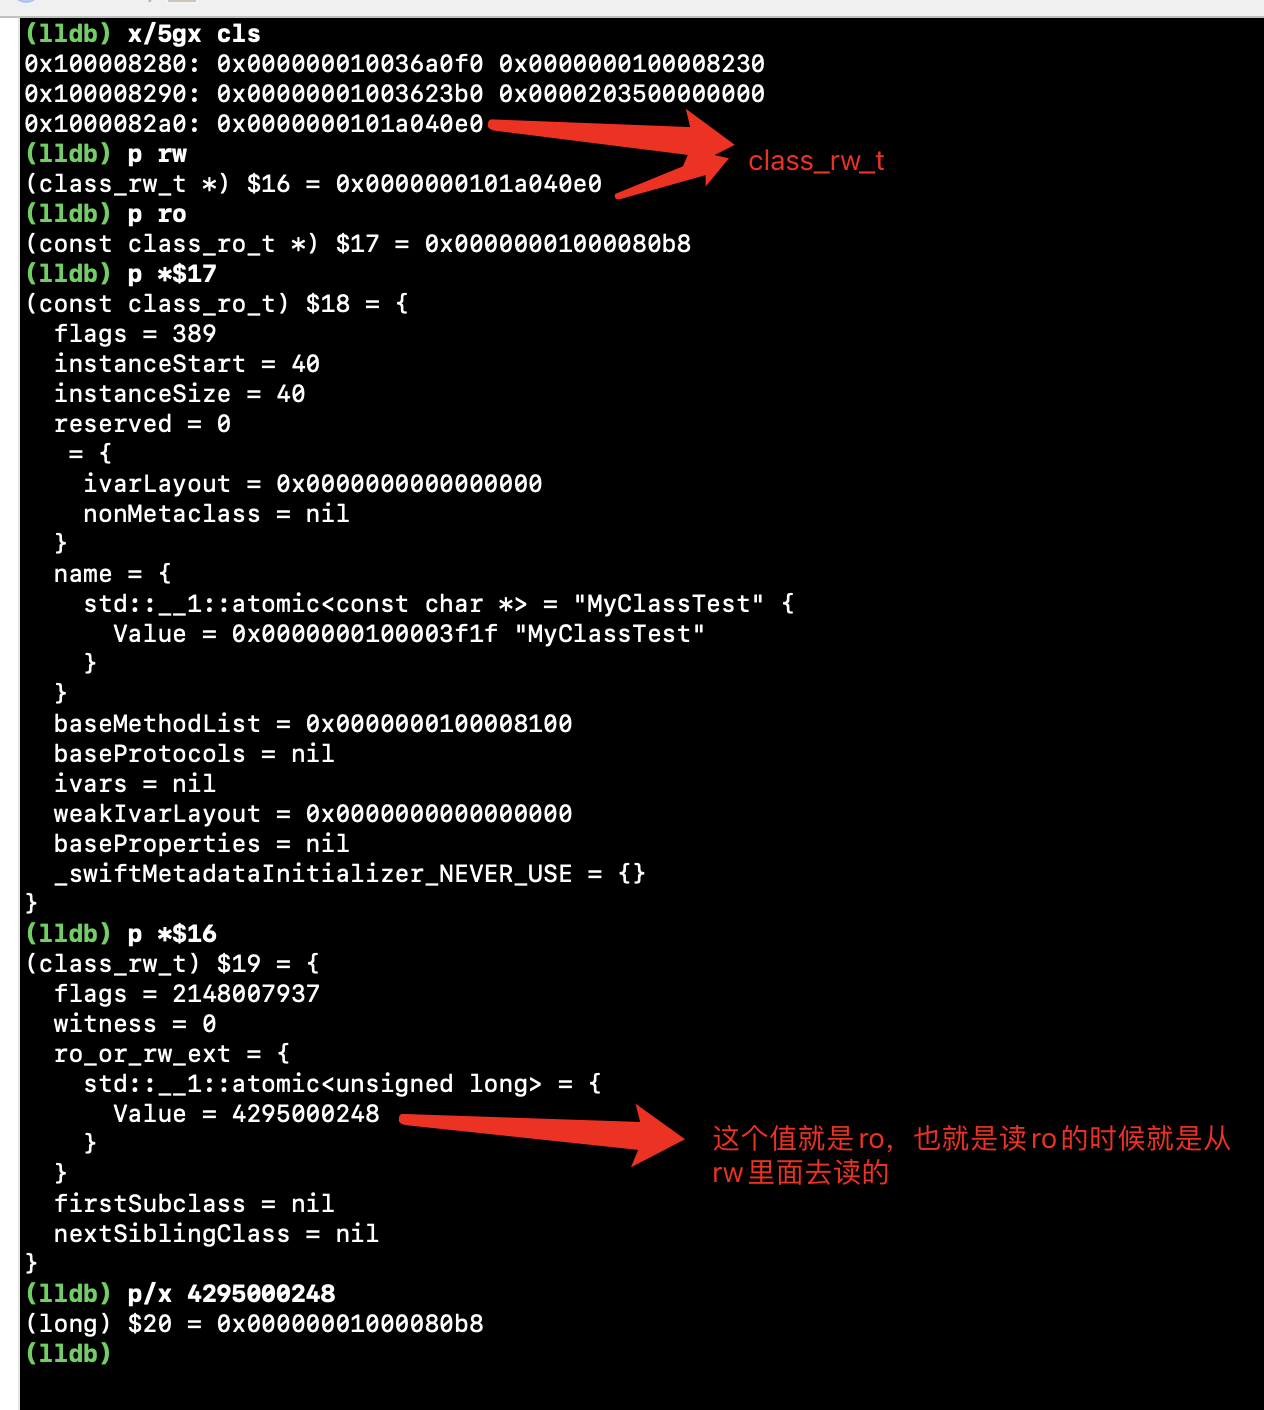
首先开辟rw空间,注意是先创建rw,再将临时变量ro设置到rw中,最后再设置cls中bits的data。
ro是clean memory(干净的内存),防止在运行时对其增删改,所以此时只是将ro拷贝到了rw中。
而rwe是在运行时,比如添加关联属性或者添加方法等,才会去创建一个rwe来存放,从而避免了rw的过度开销。
一般情况下,我们从rw读取属性、方法等时,是直接读的ro中的信息。
比如这里就可以看出,会判断是否有ext,有的话从ext中读取(因为rw_ext中绑定了ro),没有的话直接读取ro。
 const class_ro_t *ro() const {
        auto v = get_ro_or_rwe();
        if (slowpath(v.is<class_rw_ext_t *>())) {
            return v.get<class_rw_ext_t *>(&ro_or_rw_ext)->ro;
        }
        return v.get<const class_ro_t *>(&ro_or_rw_ext);
    }
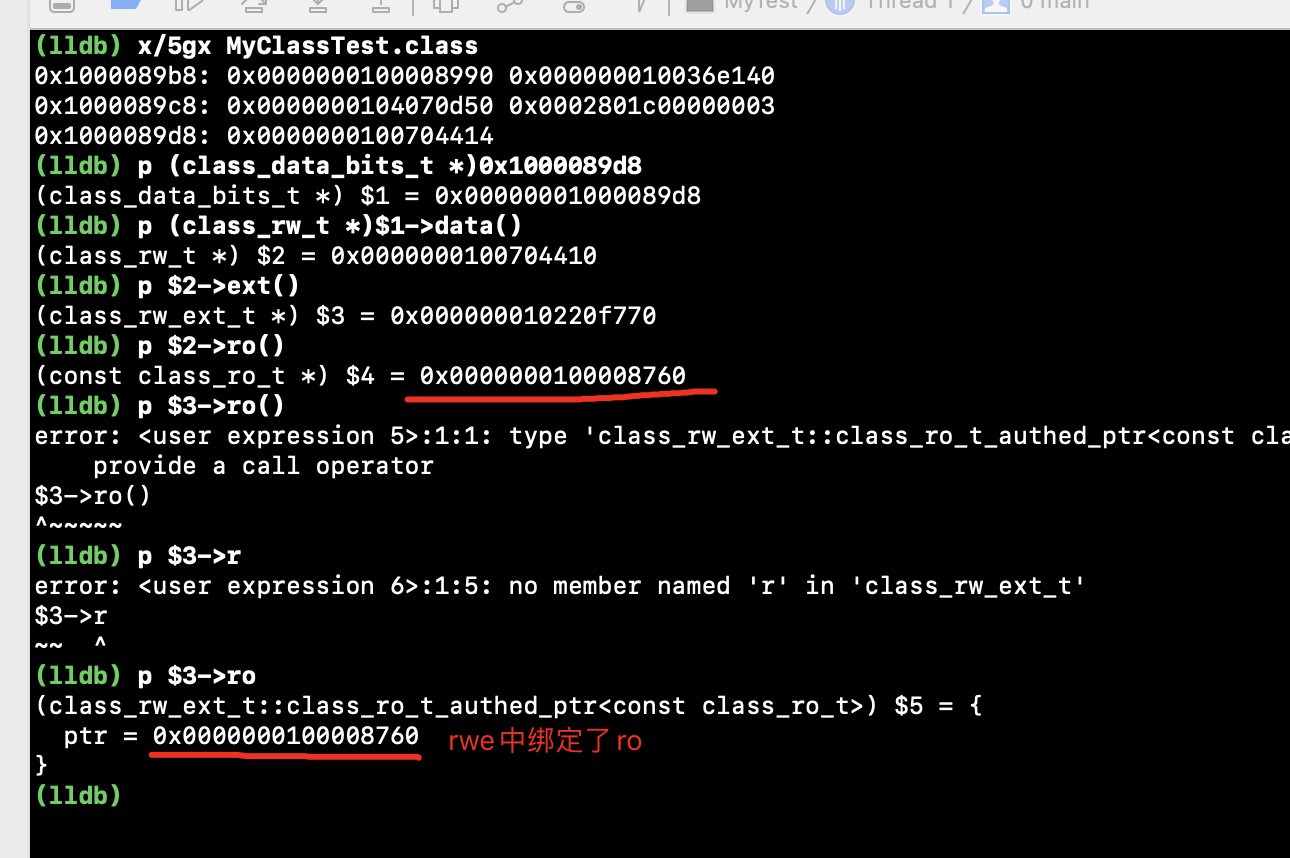
通过打印也可以看到,rwe中绑定了ro。
接着往下:
    cls->cache.initializeToEmptyOrPreoptimizedInDisguise();
#if FAST_CACHE_META
    if (isMeta) cls->cache.setBit(FAST_CACHE_META);
#endif
    // Choose an index for this class.
    // Sets cls->instancesRequireRawIsa if indexes no more indexes are available
    cls->chooseClassArrayIndex();
    if (PrintConnecting) {
        _objc_inform("CLASS: realizing class '%s'%s %p %p #%u %s%s",
                     cls->nameForLogging(), isMeta ? " (meta)" : "",
                     (void*)cls, ro, cls->classArrayIndex(),
                     cls->isSwiftStable() ? "(swift)" : "",
                     cls->isSwiftLegacy() ? "(pre-stable swift)" : "");
    }
这段代码不做重点。
继续:
    // Realize superclass and metaclass, if they aren't already.
    // This needs to be done after RW_REALIZED is set above, for root classes.
    // This needs to be done after class index is chosen, for root metaclasses.
    // This assumes that none of those classes have Swift contents,
    //   or that Swift's initializers have already been called.
    //   fixme that assumption will be wrong if we add support
    //   for ObjC subclasses of Swift classes.
    supercls = realizeClassWithoutSwift(remapClass(cls->getSuperclass()), nil);
    metacls = realizeClassWithoutSwift(remapClass(cls->ISA()), nil);
这里是,会对父类和元类进行递归的初始化,也就是完成整个继承链和元类继承链的初始化。
再继续往下:
#if SUPPORT_NONPOINTER_ISA
    if (isMeta) {
        // Metaclasses do not need any features from non pointer ISA
        // This allows for a faspath for classes in objc_retain/objc_release.
        cls->setInstancesRequireRawIsa();
    } else {
        // Disable non-pointer isa for some classes and/or platforms.
        // Set instancesRequireRawIsa.
        bool instancesRequireRawIsa = cls->instancesRequireRawIsa();
        bool rawIsaIsInherited = false;
        static bool hackedDispatch = false;

        if (DisableNonpointerIsa) {
            // Non-pointer isa disabled by environment or app SDK version
            instancesRequireRawIsa = true;
        }
        else if (!hackedDispatch  &&  0 == strcmp(ro->getName(), "OS_object"))
        {
            // hack for libdispatch et al - isa also acts as vtable pointer
            hackedDispatch = true;
            instancesRequireRawIsa = true;
        }
        else if (supercls  &&  supercls->getSuperclass()  &&
                 supercls->instancesRequireRawIsa())
        {
            // This is also propagated by addSubclass()
            // but nonpointer isa setup needs it earlier.
            // Special case: instancesRequireRawIsa does not propagate
            // from root class to root metaclass
            instancesRequireRawIsa = true;
            rawIsaIsInherited = true;
        }

        if (instancesRequireRawIsa) {
            cls->setInstancesRequireRawIsaRecursively(rawIsaIsInherited);
        }
    }
// SUPPORT_NONPOINTER_ISA
#endif
这段代码主要是对cls->isa的一些处理,不做重点研究了。
继续:
    // Update superclass and metaclass in case of remapping
    cls->setSuperclass(supercls);
    cls->initClassIsa(metacls);
    // Reconcile instance variable offsets / layout.
    // This may reallocate class_ro_t, updating our ro variable.
    if (supercls  &&  !isMeta) reconcileInstanceVariables(cls, supercls, ro);
    // Set fastInstanceSize if it wasn't set already.
    cls->setInstanceSize(ro->instanceSize);
这里就是完成继承链的绑定,然后设置InstanceSize。
回顾在对象的探索中,_class_createInstanceFromZone核心函数的第一步就是获取开辟空间大小, 其中size = cls->instanceSize(extraBytes);就是拿到了 cls->setInstanceSize(ro->instanceSize);所设置的大小。
还有一个小问题,如果cls是元类的话,此时只能p出来地址,因为此时元类还没有处理完毕,无法打印名称。
  // Copy some flags from ro to rw
    if (ro->flags & RO_HAS_CXX_STRUCTORS) {
        cls->setHasCxxDtor();
        if (! (ro->flags & RO_HAS_CXX_DTOR_ONLY)) {
            cls->setHasCxxCtor();
        }
    }
    // Propagate the associated objects forbidden flag from ro or from
    // the superclass.
    if ((ro->flags & RO_FORBIDS_ASSOCIATED_OBJECTS) ||
        (supercls && supercls->forbidsAssociatedObjects()))
    {
        rw->flags |= RW_FORBIDS_ASSOCIATED_OBJECTS;
    }
这里是系统给类加了一个Cxx的函数,我们平时用class_dump出来的头文件中就有这个函数。
最后再来看下重点:
    // Connect this class to its superclass's subclass lists
    if (supercls) {
        addSubclass(supercls, cls);
    } else {
        addRootClass(cls);
    }
    // Attach categories
    methodizeClass(cls, previously);
    return cls;
}
methodizeClass 方法话当前的类。
二、methodizeClass
我们通过上面的探索,已经知道了类的信息从macho中读取,并且设置了ro->rw->rwe。
但是比如我们进行方法慢速查找的过程中,是通过二分查找,而二分查找是需要先进行方法排序的。那么方法排序是怎么排的呢?下面就继续探索methodizeClass函数。
static void methodizeClass(Class cls, Class previously)
{
    runtimeLock.assertLocked();

    bool isMeta = cls->isMetaClass();
    auto rw = cls->data();
    auto ro = rw->ro();
    auto rwe = rw->ext();
这段代码是将rw、ro、rwe放到一个临时变量中。
接下来:
 // Install methods and properties that the class implements itself.
    method_list_t *list = ro->baseMethods();
    if (list) {
        //处理方法
        prepareMethodLists(cls, &list, 1, YES, isBundleClass(cls), nullptr);
        if (rwe) rwe->methods.attachLists(&list, 1);
    }

    property_list_t *proplist = ro->baseProperties;
    if (rwe && proplist) {
        //处理属性
        rwe->properties.attachLists(&proplist, 1);
    }

    protocol_list_t *protolist = ro->baseProtocols;
    if (rwe && protolist) {
        //处理协议
        rwe->protocols.attachLists(&protolist, 1);
    }
这里是处理方法、属性、协议。
我们来看prepareMethodLists函数:
static void
prepareMethodLists(Class cls, method_list_t **addedLists, int addedCount,
                   bool baseMethods, bool methodsFromBundle, const char *why)
{
    runtimeLock.assertLocked();

    if (addedCount == 0) return;
    if (baseMethods) {
        ASSERT(cls->hasCustomAWZ() && cls->hasCustomRR() && cls->hasCustomCore());
    } else if (cls->cache.isConstantOptimizedCache()) {
        cls->setDisallowPreoptCachesRecursively(why);
    } else if (cls->allowsPreoptInlinedSels()) {
        //....省略
    }

    for (int i = 0; i < addedCount; i++) {
        method_list_t *mlist = addedLists[i];
        ASSERT(mlist);

        // Fixup selectors if necessary
        if (!mlist->isFixedUp()) {
            fixupMethodList(mlist, methodsFromBundle, true/*sort*/);
        }
    }

    if (cls->isInitialized()) {
        objc::AWZScanner::scanAddedMethodLists(cls, addedLists, addedCount);
        objc::RRScanner::scanAddedMethodLists(cls, addedLists, addedCount);
        objc::CoreScanner::scanAddedMethodLists(cls, addedLists, addedCount);
    }
}
其中核心函数fixupMethodList
static void
fixupMethodList(method_list_t *mlist, bool bundleCopy, bool sort)
{
    runtimeLock.assertLocked();
    ASSERT(!mlist->isFixedUp());

    // fixme lock less in attachMethodLists ?
    // dyld3 may have already uniqued, but not sorted, the list
    if (!mlist->isUniqued()) {
        mutex_locker_t lock(selLock);

        // Unique selectors in list.
        for (auto& meth : *mlist) {
            const char *name = sel_cname(meth.name());
            meth.setName(sel_registerNameNoLock(name, bundleCopy));
        }
    }

    if (sort && !mlist->isSmallList() && mlist->entsize() == method_t::bigSize) {
        method_t::SortBySELAddress sorter;
        std::stable_sort(&mlist->begin()->big(), &mlist->end()->big(), sorter);
    }

    if (!mlist->isSmallList()) {
        mlist->setFixedUp();
    }
}
以上代码就是对方法进行排序,那么怎么排序的呢,我们打印一下执行过std::stable_sort之后的mlist:
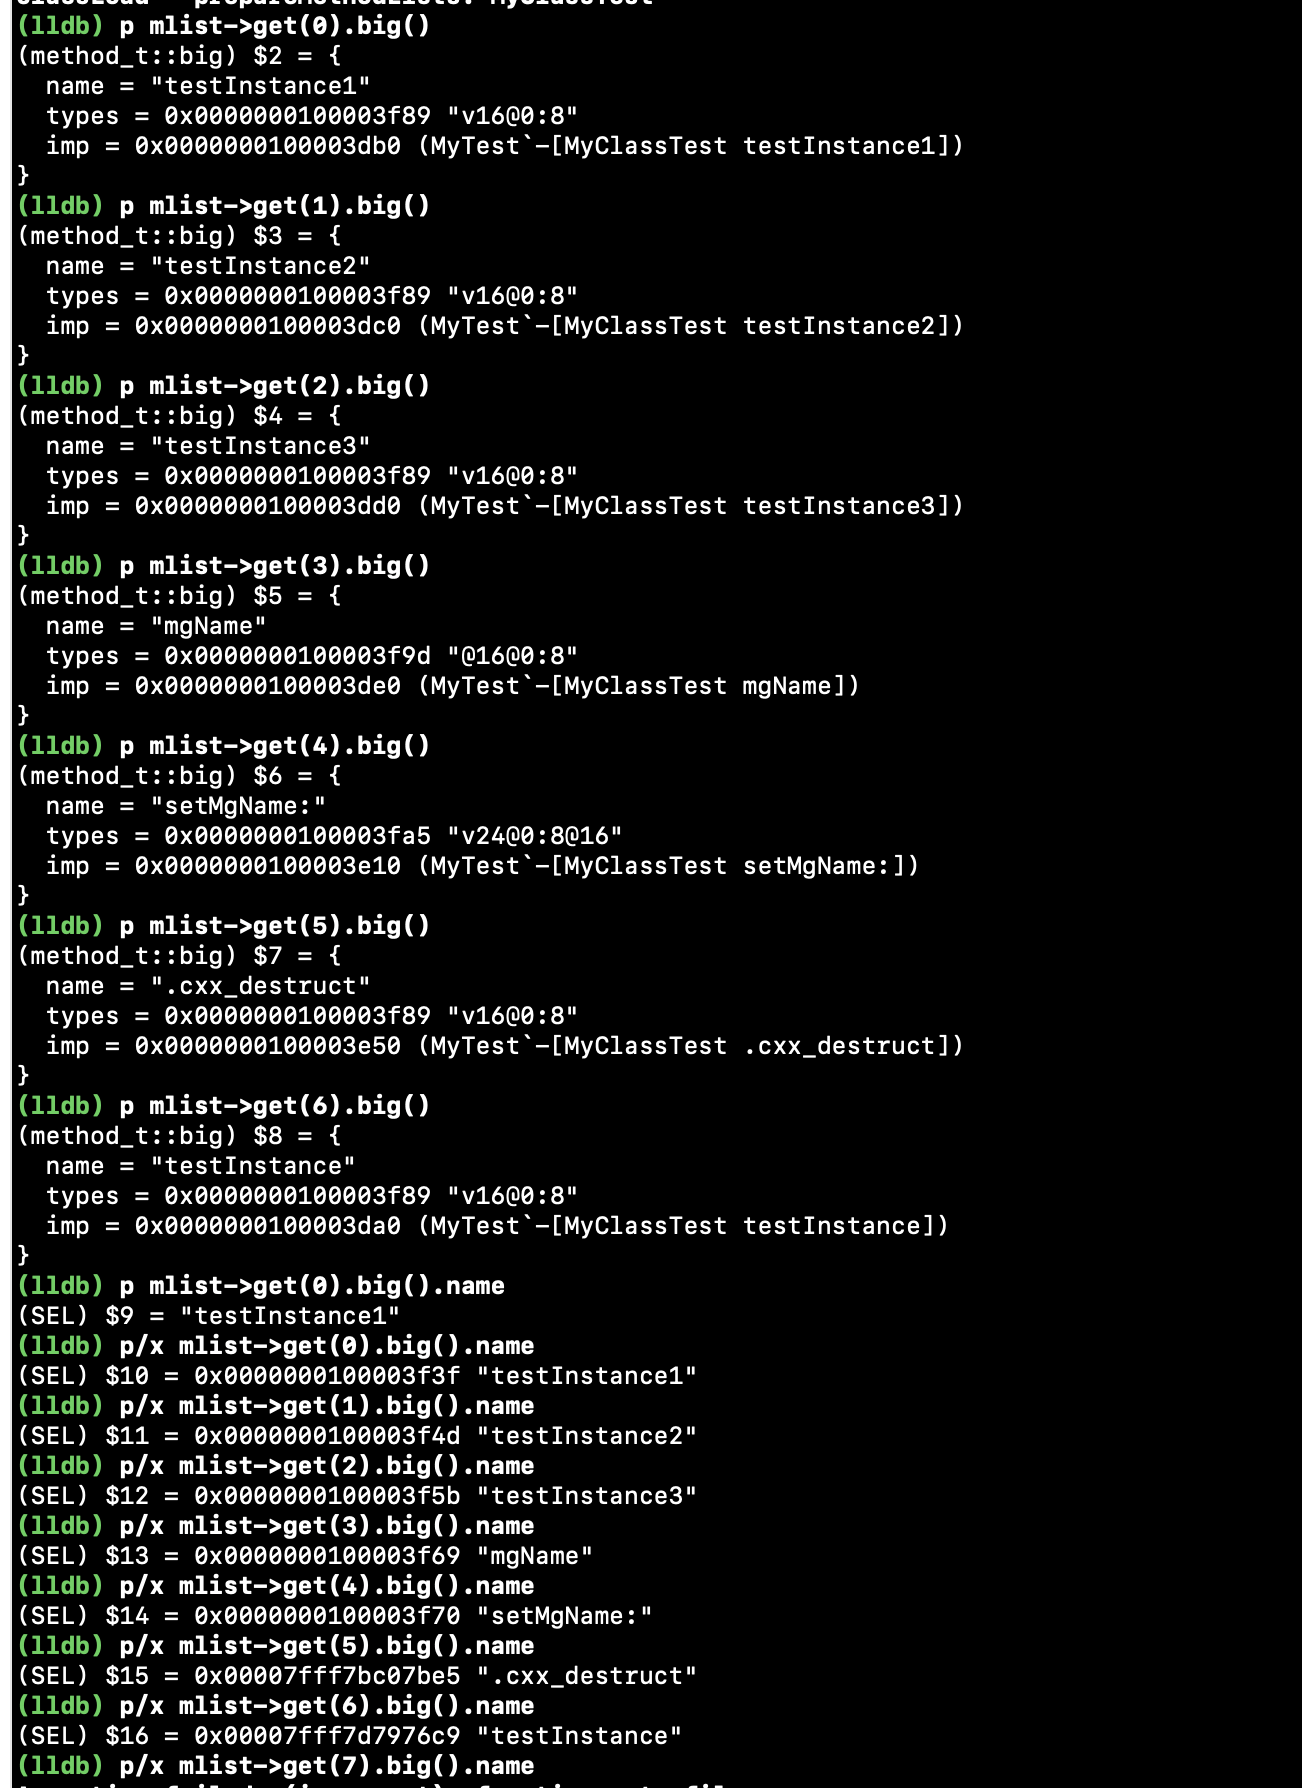
可以看到,是通过sel的地址升序排序的。
那么sel是怎么来的呢?
SEL sel_registerNameNoLock(const char *name, bool copy) {
    return __sel_registerName(name, 0, copy);  // NO lock, maybe copy
}
static SEL __sel_registerName(const char *name, bool shouldLock, bool copy)
{
    SEL result = 0;

    if (shouldLock) selLock.assertUnlocked();
    else selLock.assertLocked();

    if (!name) return (SEL)0;

    result = search_builtins(name);
    if (result) return result;

    conditional_mutex_locker_t lock(selLock, shouldLock);
	auto it = namedSelectors.get().insert(name);
	if (it.second) {
		// No match. Insert.
		*it.first = (const char *)sel_alloc(name, copy);
	}
	return (SEL)*it.first;
}
通过sel_registerNameNoLock -> __sel_registerName 可以看到。
(1)有一个sel_alloc进行了开辟,所以sel是有内存地址的。
(2)其中namedSelectors这张表就是在_read_images中,sel_init创建的。
(3)search_builtins方法:
static SEL search_builtins(const char *name)
{
#if SUPPORT_PREOPT
  if (SEL result = (SEL)_dyld_get_objc_selector(name))
    return result;
#endif
    return nil;
}
const char* _dyld_get_objc_selector(const char* selName)
{
    // Check the shared cache table if it exists.
    if ( gObjCOpt != nullptr ) {
        if ( const objc_opt::objc_selopt_t* selopt = gObjCOpt->selopt() ) {
            const char* name = selopt->get(selName);
            if (name != nullptr)
                return name;
        }
    }

    if ( gUseDyld3 )
        return dyld3::_dyld_get_objc_selector(selName);

    return nullptr;
}
因为一些系统的库,比如UIkit,它的sel需要从共享缓存中拿,所以会跳转到dyld中去根据name拿对应的sel。如果是dyld3,那么继续走dyld3中的_dyld_get_objc_selector
const char* _dyld_get_objc_selector(const char* selName)
{
    log_apis("dyld_get_objc_selector()\n");
    return gAllImages.getObjCSelector(selName);
}

const char* AllImages::getObjCSelector(const char *selName) const {
    if ( _objcSelectorHashTable == nullptr )
        return nullptr;
    return _objcSelectorHashTable->getString(selName, _objcSelectorHashTableImages.array());
}

const char* ObjCStringTable::getString(const char* selName, const Array<uintptr_t>& baseAddresses) const {
    StringTarget target = getPotentialTarget(selName);
    if (target == sentinelTarget)
        return nullptr;

    dyld3::closure::Image::ObjCImageOffset imageAndOffset;
    imageAndOffset.raw = target;

    uintptr_t sectionBaseAddress = baseAddresses[imageAndOffset.imageIndex];

    const char* value = (const char*)(sectionBaseAddress + imageAndOffset.imageOffset);
    if (!strcmp(selName, value))
        return value;
    return nullptr;
}
从getString函数中可以看到,会返回地址。
注意:如果此时有分类同名方法的话,会默认根据同名方法的imp进行升序排序。
再回到methodizeClass函数中,执行完方法排序之后,如果rwe有值,再对rwe进行处理。
三、懒加载类和非懒加载类
我们回到调用realizeClassWithoutSwift的地方,可以看到代码注释:Realize non-lazy classes (for +load methods and static instances(暂不关注))
实现一个非懒加载类。在类中添加+(void)load方法之后,就会从懒加载类变成非懒加载类。
因为+(void)load方法是在load_imags的时候就调用了,如果此时没有去加载实现类,那么怎么能够调用+(void)方法呢,所有如果类写了+(void)load方法,它就会提前去加载信息。
我们知道了非懒加载的情况,那么懒加载类是怎么去加载信息的呢?
我们在realizeClassWithoutSwift(Class cls, Class previously)打断点,然后bt查看堆栈
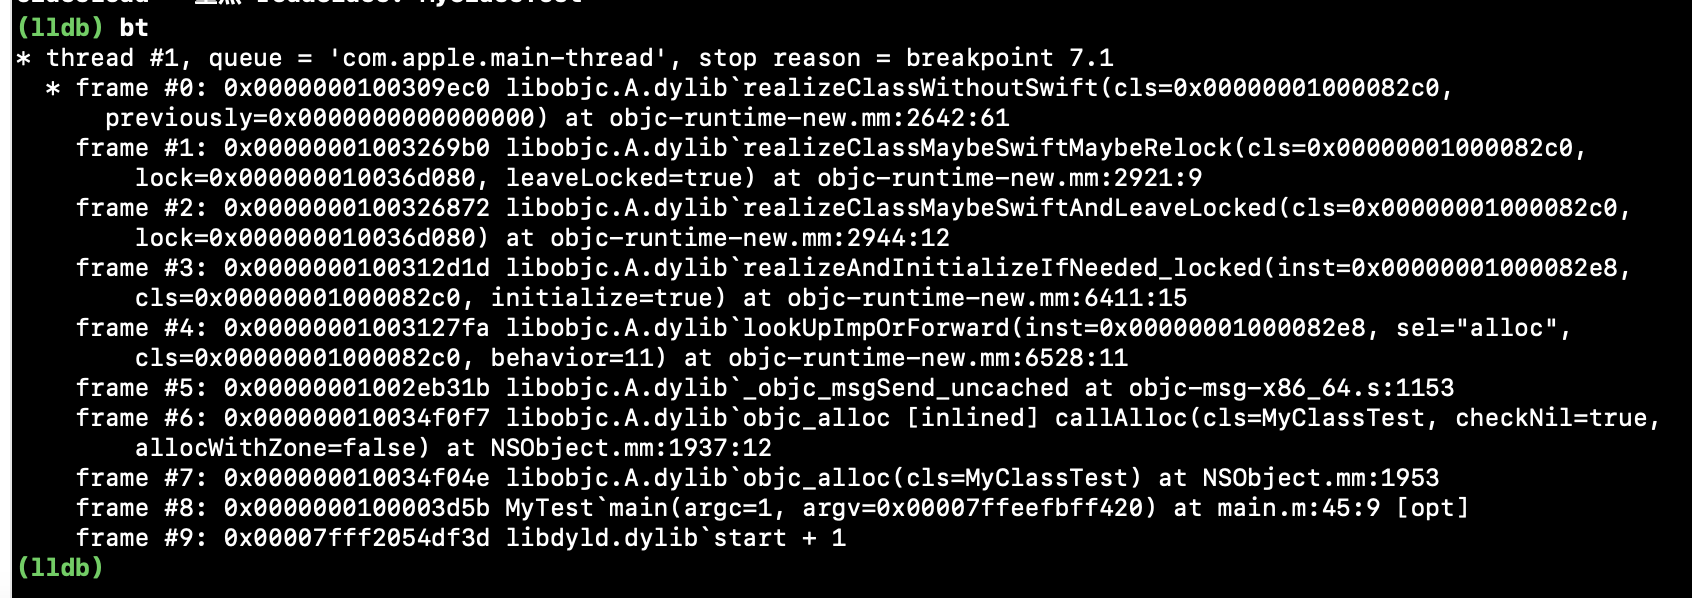
可以看到:lookUpImpOrForward->realizeAndInitializeIfNeeded_locked->realizeClassMaybeSwiftAndLeaveLocked->realizeClassMaybeSwiftMaybeRelock
证明懒加载类是在第一次消息发送的时候去加载信息的。
那为什么要区分懒加载和非懒加载呢?
因为加载类信息的时候,会处理很多的方法,创建很多的临时变量,还要进行排序等,比较耗时,如果都放在main函数之前来做,会增加启动的时间。
小结:
懒加载类的情况:
lookUpImpOrForward - > realizeClassMaybeSwiftMaybeRelock -> realizeClassWithoutSwift -> methodizeClass
非懒加载类的情况:
readClass->_getObjc2NonlazyClassList -> remapClass -> realizeClassWithoutSwift -> methodizeClass
四、分类的本质
先定义一个MyClassTest的分类
@protocol TestProtocol <NSObject>

- (void)testProtocol;

@end

@interface MyClassTest (Test) <TestProtocol>

@property (nonatomic, copy) NSString *cate_name;
@property (nonatomic, assign) int cate_age;

- (void)cate_instanceMethod1;
- (void)cate_instanceMethod2;
- (void)cate_instanceMethod3;
+ (void)cate_classMethod;

@end

@implementation MyClassTest (Test)

- (void)cate_instanceMethod1 {
    NSLog(@"%s",__FUNCTION__);
}

- (void)cate_instanceMethod2 {
    NSLog(@"%s",__FUNCTION__);
}

- (void)cate_instanceMethod3 {
    NSLog(@"%s",__FUNCTION__);
}

+ (void)cate_classMethod {
    NSLog(@"%s",__FUNCTION__);
}

@end
通过clang -rewrite-objc MyClassTest-Test.m -o MyClassTest-Test.cpp
编译成c++
//分类:方法 -> attachtoclass
struct _category_t {
	const char *name;
	struct _class_t *cls;
	const struct _method_list_t *instance_methods;
	const struct _method_list_t *class_methods;
	const struct _protocol_list_t *protocols;
	const struct _prop_list_t *properties;
};
static struct _category_t _OBJC_$_CATEGORY_MyClassTest_$_Test __attribute__ ((used, section ("__DATA,__objc_const"))) =
{
	"MyClassTest",
	0, // &OBJC_CLASS_$_MyClassTest,
	(const struct _method_list_t *)&_OBJC_$_CATEGORY_INSTANCE_METHODS_MyClassTest_$_Test,
	(const struct _method_list_t *)&_OBJC_$_CATEGORY_CLASS_METHODS_MyClassTest_$_Test,
	(const struct _protocol_list_t *)&_OBJC_CATEGORY_PROTOCOLS_$_MyClassTest_$_Test,
	(const struct _prop_list_t *)&_OBJC_$_PROP_LIST_MyClassTest_$_Test,
};
可以看到category_t的结构。
这里先说一个经典的面试题:为什么分类里面不能直接添加属性呢?
是因为分类里面没有对应的get和set方法,并且没有成员变量。
五、classProperties
struct category_t {
    const char *name;
    classref_t cls;
    WrappedPtr<method_list_t, PtrauthStrip> instanceMethods;
    WrappedPtr<method_list_t, PtrauthStrip> classMethods;
    struct protocol_list_t *protocols;
    struct property_list_t *instanceProperties;
    // Fields below this point are not always present on disk.
    struct property_list_t *_classProperties;

    method_list_t *methodsForMeta(bool isMeta) {
        if (isMeta) return classMethods;
        else return instanceMethods;
    }

    property_list_t *propertiesForMeta(bool isMeta, struct header_info *hi);

    protocol_list_t *protocolsForMeta(bool isMeta) {
        if (isMeta) return nullptr;
        else return protocols;
    }
};
通过clang编译之后,我们再看objc的源码,可以看到category_t的结构将properties分成了instanceProperties 和 _classProperties。
instanceProperties我们很好理解,就是对象属性。但是_classProperties是什么呢?
Objective-C Class Properties 早在 WWDC 2016 中就已经公示,给 Objective-C 加入这个特性主要是为了与 Swift 类型属性相互操作。
@interface MyClassTest : NSObject

@property (nonatomic, copy) NSString *mgName;
@property (class, nonatomic) NSString *version;
- (void)testInstance;
+ (void)classInstance;

@end
@implementation MyClassTest
static NSString* _version = @"0.1.1";

+ (NSString *)version {
    return _version;
}
//...
@end
比如我定一个类属性,在内部定义一个静态变量,然后在定一个类的get方法 + (NSString *)version。那么在外部就可以调用类属性读取version。
对于的swift的类型属性:
class SwiftClassText: NSObject {
    class var version: String {
        return "0.1.1"
    }
}
这么做的好处就是,可以方便的读取类的信息,但是需要自己写get/set方法。
看一些文章还说可以方法做组件化解耦合,这里我没有去尝试过,未来可以试试看。