OC底层 - 内存管理
前言
一、内存布局
二、TaggedPointer
三、引用计数
四、弱引用
五、强引用
六、AutoRelease&AutoReleasePool
七、自动释放池相关问题
早在14年的时候,MRC时代还没有完全结束,就有人说大牛玩内存。那么今天开始,就朝着大牛的路线继续探索IOS内存管理相关知识点。
(注:源码已经改为objc-838版本)
一、内存布局
1、内存的布局
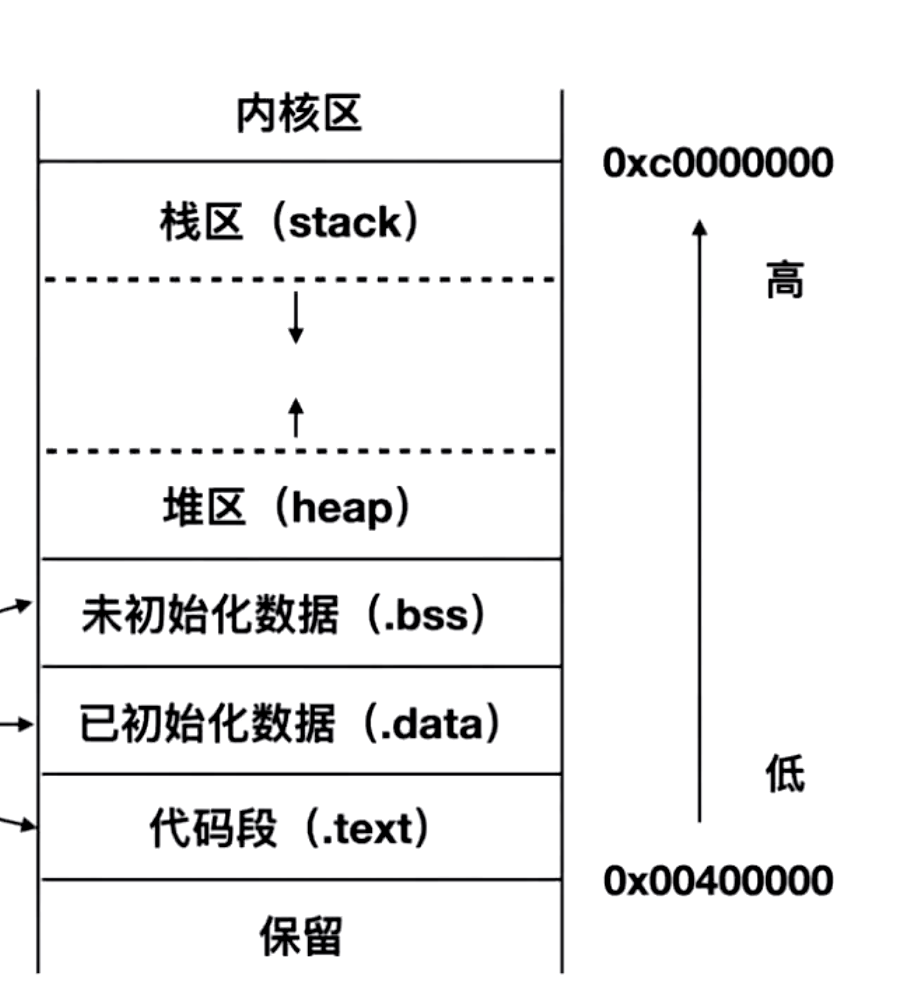
由上图可知:从高地址到低地址依次为:
- 内核区
- 栈区 stack
- 堆区 heap
- 全局区(未初始化数据 .bss 和 已初始化数据 .data)
- 常量区(图中漏了)
- 代码段 .text
- 保留
那么0xc0000000 是怎么来的呢,将0xc0000000转为十进制:3221225472,然后除1024 * 1024 * 1024 = 3,也就是3GB。还有1GB也就留给了内核区。
那么又为什么从0x00400000开始,不是从0x00000000开始呢,因为需要预留一部分内存,防止出错。
2、内存每个区域的作用
- 内核区:系统的操作
- 栈区:参数、函数、方法等,一般为:0x7开头
- 堆区:通过alloc分配的对象,一般为0x6开头
- BSS段:未初始化的全局变量,静态变量,一般为0x1开头
- 数据段:已初始化的全局变量,静态变量,一般为0x1开头
- 常量区:该区是编译时分配的内存空间,在程序运行过程中,此内存中的数据一直存在,程序结束后由系统释放,存放常量:整型、字符型、浮点、字符串等.
- text:程序代码,加载到内存中
- 保留区:系统操作
二、TaggedPointer
1、定义
首先一个指针地址占64位,然而并没有真正地使用到所有这些位,只在一个真正的对象指针中使用了中间的这些位。由于对齐要求的存在,低位始终为0。对象必须总是位于指针大小倍数的一个地址中。由于地址空间有限,所以高位始终为0。我们实际上不会用到2^64。这些高位和低位总是0。
比如从这些始终为0的位中选择一个位并把它设置为1。这可以让我们立即知道,这不是一个真正的对象指针,然后可以给其他所有位赋予一些其他的意义,这种指针就叫做Tagged Pointer。
小结一下:
- tagged pointer 就是小对象类型
- tagged pointer = 值 + 标记,不需要存放在堆中
- 在内存存储过程中快了3倍。而在整个创建和销毁过程中,快了106倍。
3、TaggedPointer对象分析
打印下面1个TaggedPointer对象
NSString *str1 = [NSString stringWithFormat:@"b"];
NSLog(@"%p-%@",str1,str1);
打印结果为:0xb83cfcb2b6dece35-b
可以看到,苹果针对TaggedPointer对象做了一层混淆,它的地址看起来像乱码。
回顾_read_images函数,其中会初始化一个objc_debug_taggedpointer_obfuscator,作为混淆用的密钥。
void _read_images(header_info **hList, uint32_t hCount, int totalClasses, int unoptimizedTotalClasses)
{
    //...
    initializeTaggedPointerObfuscator();
    //...
}
static void
initializeTaggedPointerObfuscator(void)
{

    if (!DisableTaggedPointerObfuscation){
//    if (!DisableTaggedPointerObfuscation && dyld_program_sdk_at_least(dyld_fall_2018_os_versions)) {
        // Pull random data into the variable, then shift away all non-payload bits.
        arc4random_buf(&objc_debug_taggedpointer_obfuscator,
                       sizeof(objc_debug_taggedpointer_obfuscator));
        objc_debug_taggedpointer_obfuscator &= ~_OBJC_TAG_MASK;

#if OBJC_SPLIT_TAGGED_POINTERS
        // The obfuscator doesn't apply to any of the extended tag mask or the no-obfuscation bit.
        objc_debug_taggedpointer_obfuscator &= ~(_OBJC_TAG_EXT_MASK | _OBJC_TAG_NO_OBFUSCATION_MASK);

        // Shuffle the first seven entries of the tag permutator.
        int max = 7;
        for (int i = max - 1; i >= 0; i--) {
            int target = arc4random_uniform(i + 1);
            swap(objc_debug_tag60_permutations[i],
                 objc_debug_tag60_permutations[target]);
        }
#endif
    } else {
        objc_debug_taggedpointer_obfuscator = 0;
    }
}
依据objc_debug_taggedpointer_obfuscator,TaggedPointer会有编解码的方法:
static inline void * _Nonnull
_objc_encodeTaggedPointer(uintptr_t ptr)
{
    uintptr_t value = (objc_debug_taggedpointer_obfuscator ^ ptr);
    //.....
    return (void *)value;
}

static inline uintptr_t
_objc_decodeTaggedPointer_noPermute(const void * _Nullable ptr)
{
    uintptr_t value = (uintptr_t)ptr;
    //......
    return value ^ objc_debug_taggedpointer_obfuscator;
}

static inline uintptr_t
_objc_decodeTaggedPointer(const void * _Nullable ptr)
{
    uintptr_t value = _objc_decodeTaggedPointer_noPermute(ptr);
    //......
    return value;
}
其实这个编解码的方法也不难,就是通过异或操作来加解密的。
我们就还原一下解码方法来打印一下str1
extern uintptr_t objc_debug_taggedpointer_obfuscator;

uintptr_t
_objc_decodeTaggedPointer_noPermute(const void * _Nullable ptr)
{
    uintptr_t value = (uintptr_t)ptr;
    //......
    return value ^ objc_debug_taggedpointer_obfuscator;
}

uintptr_t
_objc_decodeTaggedPointer(const void * _Nullable ptr)
{
    uintptr_t value = _objc_decodeTaggedPointer_noPermute(ptr);
    //......
    return value;
}

NSLog(@"0x%lx",_objc_decodeTaggedPointer((__bridge const void * _Nullable)(str1)));
当然也可以通过环境变量关闭掉这层混淆:
OPTION( DisableTaggedPointerObfuscation, OBJC_DISABLE_TAG_OBFUSCATION, "disable obfuscation of tagged pointers")

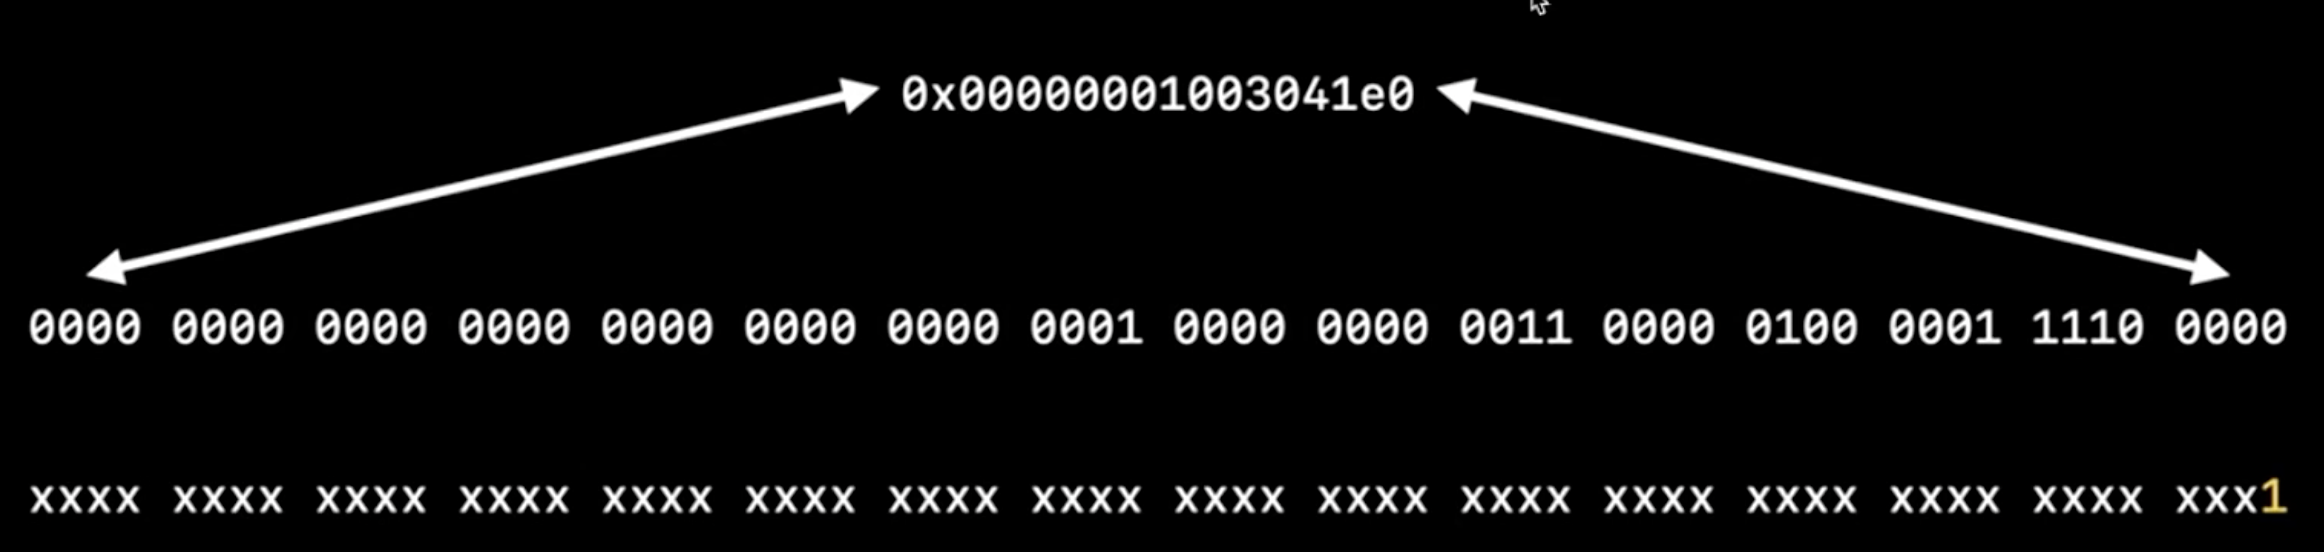
最终打印出来的值为:0xa000000000000621。那么这个值是什么意思呢?
通过查阅资料,可以先打印一下二进制(模拟器环境):
(lldb) p/t 0xa000000000000621
(unsigned long) $0 = 0b1010000000000000000000000000000000000000000000000000011000100001
以x86架构为例:
- 高4位:1位标识+3位类型
- 中间: 存储对象的值(string用ASCII码表示)
- 低四位:具体看这个对象是什么类型,比如NSString时为length,NSnumber则为里面数的类型Int为2、long为3、float为4、double为5。
验证一下:
首先打印数据位:
(lldb) po 0b01100010
98
数据打印出来是98,对照ASCII表,98就是b,没有问题。
然后打印高2-4位:
(lldb) p 0b010
(int) $2 = 2
(lldb)
可以看到类型标识为2,那么对应的标识在objc源码中也可以找到:
{
    // 60-bit payloads
    OBJC_TAG_NSAtom            = 0,
    OBJC_TAG_1                 = 1,
    OBJC_TAG_NSString          = 2,
    OBJC_TAG_NSNumber          = 3,
    OBJC_TAG_NSIndexPath       = 4,
    OBJC_TAG_NSManagedObjectID = 5,
    OBJC_TAG_NSDate            = 6,

    // 60-bit reserved
    OBJC_TAG_RESERVED_7        = 7,

    // 52-bit payloads
    OBJC_TAG_Photos_1          = 8,
    OBJC_TAG_Photos_2          = 9,
    OBJC_TAG_Photos_3          = 10,
    OBJC_TAG_Photos_4          = 11,
    OBJC_TAG_XPC_1             = 12,
    OBJC_TAG_XPC_2             = 13,
    OBJC_TAG_XPC_3             = 14,
    OBJC_TAG_XPC_4             = 15,
    OBJC_TAG_NSColor           = 16,
    OBJC_TAG_UIColor           = 17,
    OBJC_TAG_CGColor           = 18,
    OBJC_TAG_NSIndexSet        = 19,
    OBJC_TAG_NSMethodSignature = 20,
    OBJC_TAG_UTTypeRecord      = 21,

    // When using the split tagged pointer representation
    // (OBJC_SPLIT_TAGGED_POINTERS), this is the first tag where
    // the tag and payload are unobfuscated. All tags from here to
    // OBJC_TAG_Last52BitPayload are unobfuscated. The shared cache
    // builder is able to construct these as long as the low bit is
    // not set (i.e. even-numbered tags).
    OBJC_TAG_FirstUnobfuscatedSplitTag = 136, // 128 + 8, first ext tag with high bit set

    OBJC_TAG_Constant_CFString = 136,

    OBJC_TAG_First60BitPayload = 0,
    OBJC_TAG_Last60BitPayload  = 6,
    OBJC_TAG_First52BitPayload = 8,
    OBJC_TAG_Last52BitPayload  = 263,

    OBJC_TAG_RESERVED_264      = 264
};
其中2对应的就是OBJC_TAG_NSString类型。
最后看下低四位,代表长度1。
在arm64架构中看它的二进制:

可以看到和x86正好是相反的,低4位中从左到右,第一位(1)是tagged pointer标识,后3位(010)是类型标识。
3、TaggedPointer面试题
- (void)taggedPointerDemo {
    self.queue = dispatch_queue_create("com.magic.cn", DISPATCH_QUEUE_CONCURRENT);
    for (int i = 0; i<10000; i++) {
        dispatch_async(self.queue, ^{
            self.nameStr = [NSString stringWithFormat:@"magic"];
             NSLog(@"%@",self.nameStr);
        });
    }
}

- (void)touchesBegan:(NSSet<UITouch *> *)touches withEvent:(UIEvent *)event{
    for (int i = 0; i<10000; i++) {
        dispatch_async(self.queue, ^{
            self.nameStr = [NSString stringWithFormat:@"程序改变人生-magic"];
            NSLog(@"%@",self.nameStr);
        });
    }
}
进入页面的时候,先调用taggedPointerDemo,此时可以正常的打印。
当点击屏幕的时候,就会崩溃。
原因是因为:
在taggedPointerDemo方法中,打印self.nameStr,它是NSTaggedPointerString类型。
在touchesBegan方法中,打印self.nameStr,它是__NSCFString类型。
崩溃的原因就是在nameStr进行setter(对旧值release,对新值retain)方法的时候,会有多条线程同时对一个对象进行objc_release释放。从而过度释放,引起崩溃。
因为NSTaggedPointerString是存放在常量区的,是直接从指针中读取值的,不会走alloc和release的流程,所以不会引起过度释放问题。
通过objc的源码可以看到:
__attribute__((aligned(16), flatten, noinline))
id
objc_retain(id obj)
{
    if (_objc_isTaggedPointerOrNil(obj)) return obj;
    return obj->retain();
}

__attribute__((aligned(16), flatten, noinline))
void
objc_release(id obj)
{
    if (_objc_isTaggedPointerOrNil(obj)) return;
    return obj->release();
}
在objc_retain和objc_release的过程中,判断了对象是否为TaggedPointer对象,如果是就会走objc_retain和objc_release的流程。
解决方法:
很简单,通过互斥锁解决:
@synchronized (self) {
        self.nameStr = [NSString stringWithFormat:@"程序改变人生-magic"];
        NSLog(@"%@",self.nameStr);
}
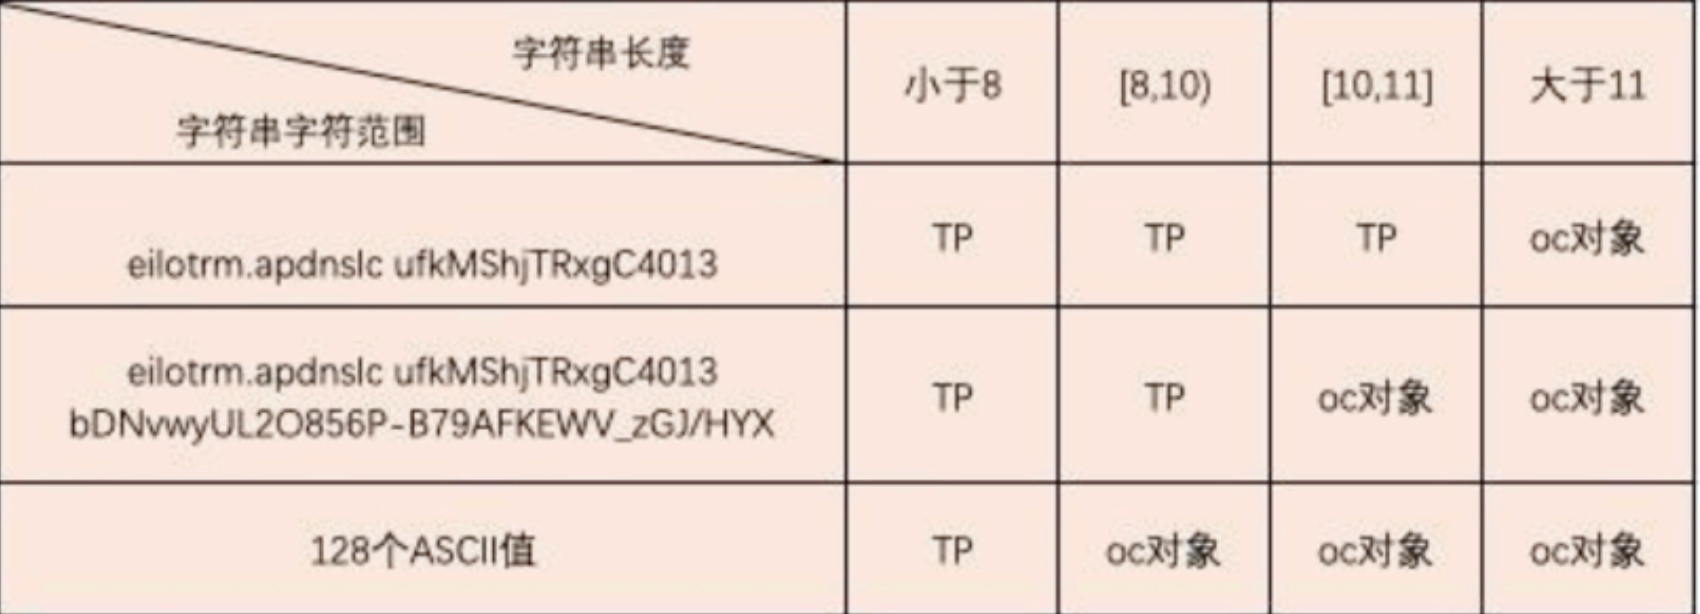
4、Tagged Point 字符串范围:
三、引用计数
1、引用计数存放
首先回顾一下对象的探索,一般情况下都会开启nonpointer_isa,其中isa_t是一个联合体,它的位域中有2个关键的元素:has_sidetable_rc和extra_rc
- has_sidetable_rc:为 1 时,则表明有外部挂的引用计数 sideTable,需要借用该变量存储进位。
- extra_rc:表示该对象的引用计数值,当extra_rc存满的时候,会将一半引用计数(RC_HALF)存在extra_rc,另一半则需要使用到has_sidetable_rc。
另外,在对象的创建成功之后,extra_rc = 1。
2、retain函数分析
ALWAYS_INLINE id
objc_object::rootRetain(bool tryRetain, objc_object::RRVariant variant)
{
    if (slowpath(isTaggedPointer())) return (id)this;

    bool sideTableLocked = false;
    bool transcribeToSideTable = false;

    isa_t oldisa;
    isa_t newisa;

    oldisa = LoadExclusive(&isa.bits);

    //objc_send发送retain消息
    if (variant == RRVariant::FastOrMsgSend) {
        // These checks are only meaningful for objc_retain()
        // They are here so that we avoid a re-load of the isa.
        if (slowpath(oldisa.getDecodedClass(false)->hasCustomRR())) {
            ClearExclusive(&isa.bits);
            if (oldisa.getDecodedClass(false)->canCallSwiftRR()) {
                return swiftRetain.load(memory_order_relaxed)((id)this);
            }
            return ((id(*)(objc_object *, SEL))objc_msgSend)(this, @selector(retain));
        }
    }

    //判断是否是非nonpointer
    if (slowpath(!oldisa.nonpointer)) {
        // a Class is a Class forever, so we can perform this check once
        // outside of the CAS loop
        if (oldisa.getDecodedClass(false)->isMetaClass()) {
            ClearExclusive(&isa.bits);
            return (id)this;
        }
    }

    do {
        transcribeToSideTable = false;
        newisa = oldisa;

        //判断新的isa是否为nonpointer,如果不是则直接操作散列表
      if (slowpath(!newisa.nonpointer)) {
            ClearExclusive(&isa.bits);
            if (tryRetain) return sidetable_tryRetain() ? (id)this : nil;
            else return sidetable_retain(sideTableLocked);
        }
        //判断是否正在释放
        // don't check newisa.fast_rr; we already called any RR overrides
        if (slowpath(newisa.isDeallocating())) {
           //....
        }
        uintptr_t carry;
        //+1 操作 #define RC_ONE   (1ULL<<56) 也就是左移56到extra_rc的位置进行+1
        newisa.bits = addc(newisa.bits, RC_ONE, 0, &carry);  // extra_rc++

        //如果满了
        if (slowpath(carry)) {
            // newisa.extra_rc++ overflowed
            if (variant != RRVariant::Full) {
                ClearExclusive(&isa.bits);
                return rootRetain_overflow(tryRetain);
            }
            // Leave half of the retain counts inline and
            // prepare to copy the other half to the side table.
            if (!tryRetain && !sideTableLocked) sidetable_lock();
            sideTableLocked = true;
            transcribeToSideTable = true;
            newisa.extra_rc = RC_HALF; //2^7
            newisa.has_sidetable_rc = true;
        }
    } while (slowpath(!StoreExclusive(&isa.bits, &oldisa.bits, newisa.bits)));

    if (variant == RRVariant::Full) {
        if (slowpath(transcribeToSideTable)) {
            // Copy the other half of the retain counts to the side table.
            sidetable_addExtraRC_nolock(RC_HALF);
        }

        if (slowpath(!tryRetain && sideTableLocked)) sidetable_unlock();
    } else {
        ASSERT(!transcribeToSideTable);
        ASSERT(!sideTableLocked);
    }
    return (id)this;
}
在retain方法中,就是对其extra_rc和散列表的操作。
3、release 分析
ALWAYS_INLINE bool
objc_object::rootRelease(bool performDealloc, objc_object::RRVariant variant)
{
    if (slowpath(isTaggedPointer())) return false;

    bool sideTableLocked = false;

    isa_t newisa, oldisa;

    oldisa = LoadExclusive(&isa.bits);

    //objc_msgSend 发送release消息
    if (variant == RRVariant::FastOrMsgSend) {
        //...
    }
    //判断是否为nonpointer
    if (slowpath(!oldisa.nonpointer)) {
       //...
    }

retry:
    do {
        newisa = oldisa;
        //判断newisa是否为nonpointer,如果不是直接操作散列表
        if (slowpath(!newisa.nonpointer)) {
            ClearExclusive(&isa.bits);
            return sidetable_release(sideTableLocked, performDealloc);
        }
        //判断newisa是否正在释放
        if (slowpath(newisa.isDeallocating())) {
            ClearExclusive(&isa.bits);
            if (sideTableLocked) {
                ASSERT(variant == RRVariant::Full);
                sidetable_unlock();
            }
            return false;
        }

        // don't check newisa.fast_rr; we already called any RR overrides
        uintptr_t carry;
        //进行--
        newisa.bits = subc(newisa.bits, RC_ONE, 0, &carry);  // extra_rc--
        if (slowpath(carry)) {
            // don't ClearExclusive()
            goto underflow;
        }
    } while (slowpath(!StoreReleaseExclusive(&isa.bits, &oldisa.bits, newisa.bits)));

    if (slowpath(newisa.isDeallocating()))
        goto deallocate;

    if (variant == RRVariant::Full) {
        if (slowpath(sideTableLocked)) sidetable_unlock();
    } else {
        ASSERT(!sideTableLocked);
    }
    return false;

 underflow:
 //... 判断是否extra_rc 减到一定值,开始操作散列表
// newisa.extra_rc-- underflowed: borrow from side table or deallocate

deallocate:
//当extra_rc和散列表都减完之后,进入dealloc流程
    // Really deallocate.
    ASSERT(newisa.isDeallocating());
    ASSERT(isa.isDeallocating());

    if (slowpath(sideTableLocked)) sidetable_unlock();

    __c11_atomic_thread_fence(__ATOMIC_ACQUIRE);

    if (performDealloc) {
        ((void(*)(objc_object *, SEL))objc_msgSend)(this, @selector(dealloc));
    }
    return true;
}
relase和retain是一个相反的操作。
4、dealloc 分析
首先dealloc会走到_objc_rootDealloc
- (void)dealloc {
    _objc_rootDealloc(self);
}
_objc_rootDealloc 会走到obj->rootDealloc();
void
_objc_rootDealloc(id obj)
{
    ASSERT(obj);

    obj->rootDealloc();
}
在rootDealloc中判断一系列的标志位,然后进行free或者object_dispose
inline void
objc_object::rootDealloc()
{
    if (isTaggedPointer()) return;  // fixme necessary?

    if (fastpath(isa.nonpointer                     &&
                 !isa.weakly_referenced             &&
                 !isa.has_assoc                     &&
#if ISA_HAS_CXX_DTOR_BIT
                 !isa.has_cxx_dtor                  &&
#else
                 !isa.getClass(false)->hasCxxDtor() &&
#endif
                 !isa.has_sidetable_rc))
    {
        assert(!sidetable_present());
        free(this);
    }
    else {
        object_dispose((id)this);
    }
}
判断是否有弱引用、是否有关联对象、是否有析构、是否有引用计数表。如果没有就直接free,如果有进入object_dispose。
id
object_dispose(id obj)
{
    if (!obj) return nil;

    objc_destructInstance(obj);
    free(obj);

    return nil;
}
继续来到objc_destructInstance:
void *objc_destructInstance(id obj)
{
    if (obj) {
        // Read all of the flags at once for performance.
        bool cxx = obj->hasCxxDtor();
        bool assoc = obj->hasAssociatedObjects();

        // This order is important.
        if (cxx) object_cxxDestruct(obj);
        if (assoc) _object_remove_assocations(obj, /*deallocating*/true);
        obj->clearDeallocating();
    }

    return obj;
}
判断如果有hasCxxDtor,则进行析构。
判断如果有关联对象,则释放关联对象相关数据
然后继续走clearDeallocating
inline void
objc_object::clearDeallocating()
{
    if (slowpath(!isa.nonpointer)) {
        // Slow path for raw pointer isa.
        sidetable_clearDeallocating();
    }
    else if (slowpath(isa.weakly_referenced  ||  isa.has_sidetable_rc)) {
        // Slow path for non-pointer isa with weak refs and/or side table data.
        clearDeallocating_slow();
    }
    assert(!sidetable_present());
}
如果是非nonpointer,则直接移除引用计数表相关数据。
如果是nonpointer,并且有弱引用或者引用计数表,则进入clearDeallocating_slow,判断清除弱引用表相关数据以及判断清除引用计数表相关数据。
5、整体表结构
(1)SideTable的结构:
struct SideTable {
    spinlock_t slock;
    RefcountMap refcnts;
    weak_table_t weak_table;

    SideTable() {
        memset(&weak_table, 0, sizeof(weak_table));
    }

    ~SideTable() {
        _objc_fatal("Do not delete SideTable.");
    }

    void lock() { slock.lock(); }
    void unlock() { slock.unlock(); }
    void forceReset() { slock.forceReset(); }

    // Address-ordered lock discipline for a pair of side tables.

    template<HaveOld, HaveNew>
    static void lockTwo(SideTable *lock1, SideTable *lock2);
    template<HaveOld, HaveNew>
    static void unlockTwo(SideTable *lock1, SideTable *lock2);
};
SideTable包括:互斥锁、引用计数表和弱引用表。而SideTable又包含在SideTablesMap中。
(2)SideTablesMap的创建:
首先在map_image->map_images_nolock函数中,第一次执行的时候,就初始化了散列列表
void
map_images_nolock(unsigned mhCount, const char * const mhPaths[],
                  const struct mach_header * const mhdrs[])
{
    if (firstTime) {
         arr_init();
    }
}
void arr_init(void)
{
    AutoreleasePoolPage::init();
    SideTablesMap.init();
    _objc_associations_init();
    if (DebugScanWeakTables)
        startWeakTableScan();
}
可以看到这里初始化了 SideTablesMap。
SideTable的读取,是通过
SideTables()[this]
把对象的指针传进去,拿到对应的SideTable:
static objc::ExplicitInit<StripedMap<SideTable>> SideTablesMap;
static StripedMap<SideTable>& SideTables() {
    return SideTablesMap.get();
}
// ExplicitInit的作用是生成一个模板类型Type的实例。而StripedMap<SideTable>& SideTables()实际上返回了全局静态StripedMap<SideTable>
大概看下StripedMap:
template<typename T>
class StripedMap {
#if TARGET_OS_IPHONE && !TARGET_OS_SIMULATOR
    enum { StripeCount = 8 };
#else
    enum { StripeCount = 64 };
#endif
//.....
}
这个StripedMap在真机下StripeCount是8,模拟器下StripeCount是64。
四、弱引用
1、CFGetRetainCount
首先看下面的demo:
 TestObject *test1 = [TestObject alloc];
 NSLog(@"%zd - %@",CFGetRetainCount((__bridge CFTypeRef)test1),test1);
  __weak typeof(test1) weakTest1 = test1;
 NSLog(@"%zd - %@",CFGetRetainCount((__bridge CFTypeRef)test1),test1);
 NSLog(@"%zd - %@",CFGetRetainCount((__bridge CFTypeRef)weakTest1),weakTest1);

 TestObject *test2 = test1;
 NSLog(@"%zd - %@",CFGetRetainCount((__bridge CFTypeRef)test2),test2);

 TestObject *test3 = test1;
 NSLog(@"%zd - %@",CFGetRetainCount((__bridge CFTypeRef)test3),test3);
在看打印之前,先看下CFGetRetainCount的源码:
- (NSUInteger)retainCount {
    return _objc_rootRetainCount(self);
}

uintptr_t
_objc_rootRetainCount(id obj)
{
    ASSERT(obj);

    return obj->rootRetainCount();
}

inline uintptr_t
objc_object::rootRetainCount()
{
    if (isTaggedPointer()) return (uintptr_t)this;
    sidetable_lock();
    isa_t bits = __c11_atomic_load((_Atomic uintptr_t *)&isa.bits, __ATOMIC_RELAXED);
    if (bits.nonpointer) {
        uintptr_t rc = bits.extra_rc;
        if (bits.has_sidetable_rc) {
            rc += sidetable_getExtraRC_nolock();
        }
        sidetable_unlock();
        return rc;
    }

    sidetable_unlock();
    return sidetable_retainCount();
}
通过CFGetRetainCount获取的引用计数的值,就是extra_rc+散列表的值,一般情况下就是extra_rc的值(散列表的值一般用不到)。
接下来看打印结果:
Memory[7399:1373714] 1 - <TestObject: 0x6000019a8540>
Memory[7399:1373714] 1 - <TestObject: 0x6000019a8540>
Memory[7399:1373714] 2 - <TestObject: 0x6000019a8540>
Memory[7399:1373714] 2 - <TestObject: 0x6000019a8540>
Memory[7399:1373714] 3 - <TestObject: 0x6000019a8540>
前2步的打印是1,没有问题,因为__weak typeof(test1) weakTest1 = test1;并没有对test1进行引用计数处理。
后2步,是进行了retain操作,也没有问题。
但是第3步打印weakTest1的引用计数却为2,这里必须要探索一下其原因了。
2、weak探索
直接使用clang编译成cpp文件:
clang -rewrite-objc -fobjc-arc -fobjc-runtime=ios-13.0.0 -isysroot /Applications/Xcode.app/Contents/Developer/Platforms/iPhoneSimulator.platform/Developer/SDKs/iPhoneSimulator.sdk main.m -o main.cpp
编译之后只有__attribute__((objc_ownership(weak))) 这么一句,也看不出来什么。
 __attribute__((objc_ownership(weak))) typeof(test1) weakTest1 = test1;
    NSLog((NSString *)&__NSConstantStringImpl__var_folders_12__nkjmvg1741fv4ynqnz517hr0000gn_T_main_1dbbc7_mi_1,CFGetRetainCount((__bridge CFTypeRef)test1),test1);
直接打开llvm的源码进行__weak的搜索,搜索的结果会和一个枚举有关联
Qualifiers::OCL_Weak
继续搜索Qualifiers::OCL_Weak,发现会调用EmitARCInitWeak:
void CodeGenFunction::EmitARCInitWeak(Address addr, llvm::Value *value) {
  // If we're initializing to null, just write null to memory; no need
  // to get the runtime involved.  But don't do this if optimization
  // is enabled, because accounting for this would make the optimizer
  // much more complicated.
  if (isa<llvm::ConstantPointerNull>(value) &&
      CGM.getCodeGenOpts().OptimizationLevel == 0) {
    Builder.CreateStore(value, addr);
    return;
  }

  emitARCStoreOperation(*this, addr, value,
                        CGM.getObjCEntrypoints().objc_initWeak,
                        llvm::Intrinsic::objc_initWeak, /*ignored*/ true);
}
此时就找到了objc_initWeak。
同样的看下汇编:

可以看到确实执行了objc_initWeak,接下来进行源码分析:
id
objc_initWeak(id *location, id newObj)
{
    if (!newObj) {
        *location = nil;
        return nil;
    }

    return storeWeak<DontHaveOld, DoHaveNew, DoCrashIfDeallocating>
        (location, (objc_object*)newObj);
}

/**
补充一个知识点:
objc_getClass(const char * _Nonnull name)
a.传入字符串类名,返回对应的类对象

object_getclass
a.传入的obj可能是instance对象、class对象、meta-class对象
b.如果是instance对象,返回class对象
c.如果是class对象,返回的是meta-class对象
d.如果是meta-class对象,返回根元类。
*/
继续看storeWeak:
static id
storeWeak(id *location, objc_object *newObj)
{
    ASSERT(haveOld  ||  haveNew);
    if (!haveNew) ASSERT(newObj == nil);

    Class previouslyInitializedClass = nil;
    id oldObj;
    SideTable *oldTable; //oldObj的weak table
    SideTable *newTable; //newObj的weak table
 retry:
    //获取oldObj的weak table
    if (haveOld) {
        //如果location原来有值,即弱引用从旧值指向新值
        oldObj = *location;
        oldTable = &SideTables()[oldObj];
    } else {
        oldTable = nil;
    }
    //获取newObj的weak table
    if (haveNew) {
        newTable = &SideTables()[newObj];
    } else {
        newTable = nil;
    }

    SideTable::lockTwo<haveOld, haveNew>(oldTable, newTable);

    if (haveOld  &&  *location != oldObj) { //如果有旧值,解锁oldObj的table和newObj的Table
        SideTable::unlockTwo<haveOld, haveNew>(oldTable, newTable);
        goto retry;
    }

    if (haveNew  &&  newObj) {
        //判断类是否初始化
        Class cls = newObj->getIsa();
        if (cls != previouslyInitializedClass  &&
            !((objc_class *)cls)->isInitialized())
        {
            SideTable::unlockTwo<haveOld, haveNew>(oldTable, newTable);
            class_initialize(cls, (id)newObj);
            previouslyInitializedClass = cls;
            goto retry;
        }
    }

    // Clean up old value, if any.
    if (haveOld) {
        //如果有旧值,需要从oldObj中移除weak指针
        weak_unregister_no_lock(&oldTable->weak_table, oldObj, location);
    }

    // Assign new value, if any.
    if (haveNew) {
        //如果弱引用一个新的Obj,则需要向newObj中注册
        /*
         &newTable->weak_table 弱引用表
         newObj 对象
         location   指针地址
         */
        newObj = (objc_object *)
            weak_register_no_lock(&newTable->weak_table,
                                  (id)newObj,
                                  location,
                                  crashIfDeallocating ? CrashIfDeallocating : ReturnNilIfDeallocating);
        if (!_objc_isTaggedPointerOrNil(newObj)) {
            //设置isa中的weak标识为1
            newObj->setWeaklyReferenced_nolock();
        }
        //弱引用指针指向newObj,即弱引用和newObj是同一个指针
        *location = (id)newObj;
    }
    else {
        // No new value. The storage is not changed.
    }
    SideTable::unlockTwo<haveOld, haveNew>(oldTable, newTable);
    //调用_setWeaklyReferenced(), 重置obj的weakly_referenced的值
    callSetWeaklyReferenced((id)newObj);
    return (id)newObj;
}
/*
* 判断location(地址指针)原来是否有值,如果有值则重新指向新值,并获取oldObj的weak表
* 判断如果有newObj,获取newObj的weak表
* 判断newObj的类型是否初始化,没有则初始化,初始化后,在重新回到步骤1
* 如果location(地址指针)原来有值,需要从oldObj中移除weak指针
* 如果弱引用newObj的对象是一个新的Obj,则需要向newObj中注册
* 如果newObj不是tagged pointer或nil,则设置weakly_referenced=true,标记newObj被弱应用了
* 弱引用指针指向newObj,即弱引用和newObj是同一内存地址
* 调用_setWeaklyReferenced(), 重置obj的weakly_referenced的值
*/
核心的流程如下:
- 1、判断location(地址指针)原来是否有值,如果有值,需要从oldObj的weak表中移除此地址指针。
- 2、如果弱引用newObj的对象是一个新的对象,需要向newObj中注册
- 3、设置newObjc中isa的weak标识
3、弱引用对象的注册(weak_register_no_lock)
id
weak_register_no_lock(weak_table_t *weak_table, id referent_id,
                      id *referrer_id, WeakRegisterDeallocatingOptions deallocatingOptions)
{
    //被弱引用的对象
    objc_object *referent = (objc_object *)referent_id;
    //弱引用的对象(指针地址)
    objc_object **referrer = (objc_object **)referrer_id;

    if (_objc_isTaggedPointerOrNil(referent)) return referent_id;

    // ensure that the referenced object is viable
    //......
    // now remember it and where it is being stored
    //获取到实体
    weak_entry_t *entry;

    //如果实体存在就直接添加
    if ((entry = weak_entry_for_referent(weak_table, referent))) {
        //添加弱引用对象
        append_referrer(entry, referrer);
    }
    else {
        //通过对象从弱引用表生成一个实体
        weak_entry_t new_entry(referent, referrer);
        weak_grow_maybe(weak_table);
        weak_entry_insert(weak_table, &new_entry);
    }

    // Do not set *referrer. objc_storeWeak() requires that the
    // value not change.
    //返回被弱引用的对象
    return referent_id;
}
4、弱引用对象读取
此时对象弱引用表的创建已经清晰了,回到上面的demo,什么第3步打印weakTest1的引用计数为2呢?
继续来看弱引用对象是怎么读取的:
id
objc_loadWeak(id *location)
{
    if (!*location) return nil;
    return objc_autorelease(objc_loadWeakRetained(location));
}
objc_loadWeakRetained:
id
objc_loadWeakRetained(id *location)
{
    id obj;
    id result;
    Class cls;

    SideTable *table;

 retry:
    // fixme std::atomic this load
    //拿到被弱引用的对象
    obj = *location;
    if (_objc_isTaggedPointerOrNil(obj)) return obj;

    table = &SideTables()[obj];

    table->lock();
    if (*location != obj) {
        table->unlock();
        goto retry;
    }

    //做一层持有
    result = obj;

    cls = obj->ISA();
    if (! cls->hasCustomRR()) {
        // Fast case. We know +initialize is complete because
        // default-RR can never be set before then.
        ASSERT(cls->isInitialized());
        if (! obj->rootTryRetain()) {
            result = nil;
        }
    }
    else {
        // Slow case. We must check for +initialize and call it outside
        // the lock if necessary in order to avoid deadlocks.
        // Use lookUpImpOrForward so we can avoid the assert in
        // class_getInstanceMethod, since we intentionally make this
        // callout with the lock held.
        if (cls->isInitialized() || _thisThreadIsInitializingClass(cls)) {
            BOOL (*tryRetain)(id, SEL) = (BOOL(*)(id, SEL))
                lookUpImpOrForwardTryCache(obj, @selector(retainWeakReference), cls);
            if ((IMP)tryRetain == _objc_msgForward) {
                result = nil;
            }
            else if (! (*tryRetain)(obj, @selector(retainWeakReference))) {
                result = nil;
            }
        }
        else {
            table->unlock();
            class_initialize(cls, obj);
            goto retry;
        }
    }
    table->unlock();
    //返回获取到的被弱引用的对象
    return result;
}
可以看到,当去获取被弱引用的对象时,是通过location(地址指针)获取到被弱引用的对象,然后进行一次临时持有(result = obj),此时引用计数会+1,当出了作用域之后,引用计数会-1。
这就是为什么第三步打印为2的原因。
再举一个例子:
__weak typeof(id)weakP;
    {
        TestObject *test1 = [TestObject alloc];
        NSLog(@"%zd - %@",CFGetRetainCount((__bridge CFTypeRef)test1),test1);
        weakP = test1;
        NSLog(@"%zd - %@",CFGetRetainCount((__bridge CFTypeRef)test1),test1);
        NSLog(@"%zd - %@",CFGetRetainCount((__bridge CFTypeRef)weakP),weakP);
    }
    NSLog(@"%zd - %@",CFGetRetainCount((__bridge CFTypeRef)weakP),weakP);
此时的打印结果为:1 1 2 崩溃
因为出了作用域之后,test1已经被释放,对应的weak表的entry也被移除,所以weakP是获取不到被弱引用的对象,也就崩溃了。
5、弱引用的释放
-
A弱引用了B,如果B释放,会走以下流程,将A置为nil。
objc_object::rootDealloc() -> object_dispose(id obj) -> void *objc_destructInstance(id obj) -> objc_object::clearDeallocating() -> objc_object::clearDeallocating_slow() -> weak_clear_no_lock 移除当前对象的弱引用表。 -
A弱引用了B,如果A直接释放,会走objc_destroyWeak(id _Nullable * _Nonnull location)
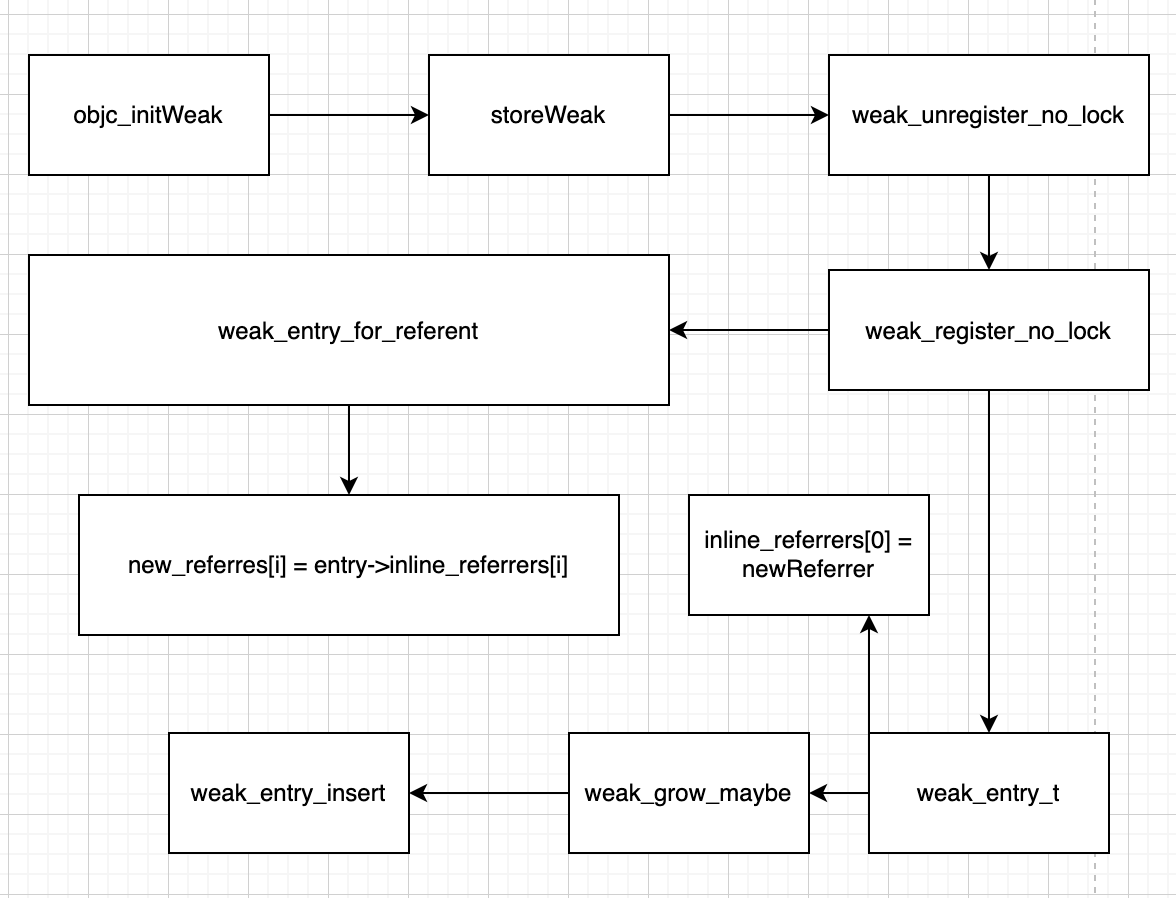
6、流程图总结
五、强引用
以NSTimer写一个demo,来具体分析一下强引用问题。
1、简单计时器问题
- (void)viewDidLoad {
    [super viewDidLoad];
    self.view.backgroundColor = [UIColor whiteColor];
    self.timer = [NSTimer timerWithTimeInterval:1 target:self selector:@selector(updateData) userInfo:nil repeats:true];
    [[NSRunLoop currentRunLoop] addTimer:self.timer forMode:NSRunLoopCommonModes];
}

- (void)updateData {
    NSLog(@"%s",__func__);
}

- (void)dealloc {
    [self.timer invalidate];
    self.timer = nil;
    NSLog(@"%s",__func__);
}
以上demo,会产生一个问题:当离开页面之后,计时器不会停止。
这个问题很简单,是因为产生了循环引用,也有很多解决方案。
下面先分析,产生循环引用的原因。
2、循环引用产生的原因
首先分析整个引用关系:self -> timer -> self(self持有timer,timer持有self)。虽然在timer中,self是以参数的形式传入,但是从苹果的文档可以知道,self确实是被timer强持有了。
The object to which to send the message specified by aSelector when the timer fires. The timer maintains a strong reference to this object until it (the timer) is invalidated.
为了打破这个循环引用,可以试一下将timer的属性设置为:
@property (nonatomic, weak) NSTimer *timer;
//....
- (void)viewDidLoad {
    [super viewDidLoad];
    self.view.backgroundColor = [UIColor whiteColor];
    NSTimer *timer = [NSTimer timerWithTimeInterval:1 target:self selector:@selector(updateData) userInfo:nil repeats:true];
    self.timer = timer;
    [[NSRunLoop currentRunLoop] addTimer:self.timer forMode:NSRunLoopCommonModes];
}
但是结果并不能打破循环引用,虽然self对timer没有强引用了,可以Runloop还对timer有一层强持有。
此时的引用关系为:Runloop -> timer -> self (Runloop持有了timer,timer持有了self)。
继续分析,如果把timer对self的这一层强引用给打破,不就可以解决了嘛。
那直接使用__weak来解决一下试试看:
- (void)test3 {
    __weak typeof(self)weakSelf = self;
    self.timer = [NSTimer timerWithTimeInterval:1 target:weakSelf selector:@selector(updateData) userInfo:nil repeats:true];
    [[NSRunLoop currentRunLoop] addTimer:self.timer forMode:NSRunLoopCommonModes];
}
可惜结果无法打破timer对self的强持有。
先回顾一下block为什么可以使用__weak 解决循环引用:
void _Block_object_assign(void *destArg, const void *object, const int flags) {
    const void **dest = (const void **)destArg;
      //....
 case BLOCK_FIELD_IS_OBJECT:
        /*******
        id object = ...;
        [^{ object; } copy];
        ********/
        // objc 指针地址 weakSelf (self)
        // arc
        _Block_retain_object(object);
        // 持有
        *dest = object;
        break;
        //....
}
当block捕获__weak修饰的对象时,_Block_retain_object是交给了arc处理,此时不会对object的引用计数+1,然后进行了指针持有,所以block捕获__weak修饰的对象,可以解决循环引用。
但是timer捕获的是__weak修饰的对象本身,会对其对象本身进行引用计数+1,所以解决不了循环引用。
3、解决循环引用的方案
(1)使用block:
- (void)test1 {
     self.timer = [NSTimer timerWithTimeInterval:1 repeats:true block:^(NSTimer * _Nonnull timer) {
        NSLog(@"%s",__func__);
    }];
[[NSRunLoop currentRunLoop] addTimer:self.timer forMode:NSRunLoopCommonModes];
}
(2)使用临时变量作为Target(中介者模式):
void updateDataFunc(void) {
    NSLog(@"%s",__func__);
}

- (void)test2 {
    NSObject *objc = [NSObject new];
    class_addMethod(NSObject.class, @selector(updateData), updateDataFunc, "v@:");
    self.timer = [NSTimer timerWithTimeInterval:1 target:objc selector:@selector(updateData) userInfo:nil repeats:true];
    [[NSRunLoop currentRunLoop] addTimer:self.timer forMode:NSRunLoopCommonModes];
}
其核心就是给临时对象添加一个定时器方法。
(3)使用系统api
- (void)didMoveToParentViewController:(UIViewController *)parent {
    if (parent == nil) {
        [self.timer invalidate];
        self.timer = nil;
        NSLog(@"%s",__func__);
    }
}
核心是监听当前控制器从父控制器移出时释放timer。
(4)使用虚基类(中介者+消息转发):
@interface MyProxy : NSProxy

+ (instancetype)proxyWithTransformObject:(id)object;

@end

@interface MyProxy ()

@property (nonatomic, weak) id object;

@end

@implementation MyProxy

+ (instancetype)proxyWithTransformObject:(id)object {
    MyProxy *proxy = [MyProxy alloc];
    proxy.object = object;
    return proxy;
}

//消息转发
- (id)forwardingTargetForSelector:(SEL)aSelector {
    return self.object;
}


//// sel - imp -
// 消息转发 self.object
//- (NSMethodSignature *)methodSignatureForSelector:(SEL)sel{
//    if (self.object) {
//        return [self.object methodSignatureForSelector:sel];
//    } else {
//        return nil;
//    }
//}
//
//- (void)forwardInvocation:(NSInvocation *)invocation{
//
//    if (self.object) {
//        [invocation invokeWithTarget:self.object];
//    } else {
//
//    }
//
//}

@end
使用如下:
- (void)test4 {
    self.proxy = [MyProxy proxyWithTransformObject:self];
    self.timer = [NSTimer timerWithTimeInterval:1 target:self.proxy selector:@selector(updateData) userInfo:nil repeats:true];
    [[NSRunLoop currentRunLoop] addTimer:self.timer forMode:NSRunLoopCommonModes];
}
(5)中介者模式
@interface MyTimerWrapper : NSObject

- (instancetype)my_initWithTimeInterval:(NSTimeInterval)ti target:(id)aTarget selector:(SEL)aSelector userInfo:(nullable id)userInfo repeats:(BOOL)yesOrNo;

- (void)my_invalidate;

@end
#import "MyTimerWrapper.h"
#import <objc/runtime.h>
#import <objc/message.h>
@interface MyTimerWrapper ()

@property (nonatomic, strong) NSTimer *timer;
@property (nonatomic, weak) id target;
@property (nonatomic, assign) SEL aSelector;

@end

@implementation MyTimerWrapper

void fireMethod(MyTimerWrapper *warpper) {

    if (warpper.target) {
        void (*my_msgSend)(void*,SEL,id) = (void *)objc_msgSend;
        my_msgSend((__bridge void *)(warpper.target),warpper.aSelector,warpper.timer);
    } else {
        //warrper 自动释放
        [warpper.timer invalidate];
        warpper.timer = nil;
    }

}

- (instancetype)my_initWithTimeInterval:(NSTimeInterval)ti target:(id)aTarget selector:(SEL)aSelector userInfo:(nullable id)userInfo repeats:(BOOL)yesOrNo {

    if (self == [super init]) {
        self.target = aTarget; //vc
        self.aSelector = aSelector; //方法
        if ([self.target respondsToSelector:aSelector]) {

            Method method = class_getInstanceMethod([self.target class], aSelector);
            const char *type = method_getTypeEncoding(method);
            class_addMethod([self class], aSelector, (IMP)fireMethod, type);

            self.timer = [NSTimer scheduledTimerWithTimeInterval:ti target:self selector:aSelector userInfo:userInfo repeats:yesOrNo];

        }

    }
    return self;
}

- (void)my_invalidate {
    [self.timer invalidate];
    self.timer = nil;
}

- (void)dealloc {
    NSLog(@"%s",__func__);
}
使用如下:
- (void)test5 {
    // self -> wrapper -> timer -> wrapper
    //            |
    //         weakself
    self.wrapper = [[MyTimerWrapper alloc] my_initWithTimeInterval:1 target:self selector:@selector(updateData) userInfo:nil repeats:true];
}
核心是:
- 创建一个timer的包装器,弱引用当前控制器。
- 给包装器添加一个计时方法,当创建执行timer之后,通过消息机制发送给当前控制器方法。
- 在计时方法中,判断弱引用的控制器是否为空来自动释放timer。
六、AutoRelease&AutoReleasePool
1、基本定义
定义和作用:当对象执行autorelease方法或直接在autoreleasePool中创建对象,将对象添加到autoreleasePool中。当自动释放池销毁的时候,会对所有对象做release操作。
简单的来说,就是对象添加到自动释放池之后,在一定的时机,会自动执行release操作。那么先抛出几个问题:
(1)autorelease对象满足什么条件?
(2)autoreleasePool的结构是什么?
(3)autorelease是在什么时候进行释放操作的?
2、ARC的规则
首先看第一个问题,autorelease对象满足哪些条件,也就是ARC的规则:
以 alloc/new/copy/mutableCopy开头的方法返回的对象不是autorelease对象。
写一个demo验证一下:
定义一个MyAutoObject类
@interface MyAutoObject : NSObject

//返回autorelease对象
+ (instancetype)createObjc;

@end
@implementation MyAutoObject

+ (instancetype)createObjc {
    MyAutoObject *objc = [MyAutoObject new];
    return objc;
}
/*
//注意:如果直接返回  [MyAutoObject new];可能会被编译器优化(或者ARC的规则),此时外层不是autorelease对象。
+ (instancetype)createObjc {
    return [MyAutoObject new];
}*/

- (void)dealloc {
    NSLog(@"%s",__func__);
}

@end
执行test1方法
- (void)test1 {

    __weak id temp = nil;
    {
        MyAutoObject *object = [MyAutoObject createObjc];
        temp = object;
    }
    NSLog(@" ==== %@",temp);
}
按正常流程来说,当object出了作用域应该释放才对(也就是temp打印应该为nil),但是真实的打印结果是:
Memory[2660:29228]  ==== <MyAutoObject: 0x600001078110>
Memory[2660:29228] -[MyAutoObject dealloc]
object出了作用域并没有释放,所以它是autorelease对象。
如果把object创建方法改为new/allco/copy/mutableCopy开头的方法:
- (void)test1 {

    __weak id temp = nil;
    {
        MyAutoObject *object = [MyAutoObject new];
//        MyAutoObject *object = [MyAutoObject alloc];
//        MyAutoObject *object = [MyAutoObject copyObjct];
//        MyAutoObject *object = [MyAutoObject mutableCopyObjct];
        temp = object;
    }
    NSLog(@" ==== %@",temp);
}
那么object出了作用域就会释放了,现在打印结果为:
Memory[2941:34028] -[MyAutoObject dealloc]
Memory[2941:34028]  ==== (null)
这也就验证了ARC的规则。
补充一种加入自动释放池的写法: __autoreleasing 修饰的对象也会加入自动释放池
- (void)test3 {
    __weak id temp = nil;
    {
       __autoreleasing MyAutoObject *object = [MyAutoObject new];
        temp = object;
    }
    NSLog(@" ==== %@",temp);
}
3、添加AutoreleasePool
(1)MRC下可以使用 NSAutoreleasePool(仅MRC使用)和@autoreleasePool{}
//1.生成一个NSAutoreleasePool对象
NSAutoreleasePool *pool = [[NSAutoreleasePool allocl] init];
//2.调用autorelease 方法
id object = [NSObject new];
[object autorelease];
//3.释放
[pool drain];
(2)ARC使用@autoreleasePool{}
- (void)test2 {
    @autoreleasepool {
        MyAutoObject *object = [MyAutoObject createObjc];
    }
}
当加入到 @autoreleasepool中后,离开@autoreleasepool作用域,object就释放了。
4、autoreleasepool编译分析
通过clang命令编译cpp文件:
clang -rewrite-objc -fobjc-arc -isysroot /Applications/Xcode.app/Contents/Developer/Platforms/iPhoneSimulator.platform/Developer/SDKs/iPhoneSimulator.sdk main.m -o main.cpp
编译main.m
int main(int argc, char * argv[]) {
    NSString * appDelegateClassName;
    @autoreleasepool {
        // Setup code that might create autoreleased objects goes here.
        appDelegateClassName = NSStringFromClass([AppDelegate class]);
    }
    return UIApplicationMain(argc, argv, nil, appDelegateClassName);
}
编译之后:
int main(int argc, char * argv[]) {
    NSString * appDelegateClassName;
    /* @autoreleasepool */ { __AtAutoreleasePool __autoreleasepool;
        appDelegateClassName = NSStringFromClass(((Class (*)(id, SEL))(void *)objc_msgSend)((id)objc_getClass("AppDelegate"), sel_registerName("class")));
    }
    return UIApplicationMain(argc, argv, __null, appDelegateClassName);
}
可以看到 __AtAutoreleasePool __autoreleasepool;
struct __AtAutoreleasePool {
  __AtAutoreleasePool() {atautoreleasepoolobj = objc_autoreleasePoolPush();}
  ~__AtAutoreleasePool() {objc_autoreleasePoolPop(atautoreleasepoolobj);}
  void * atautoreleasepoolobj;
};
__AtAutoreleasePool是一个结构体,回顾C++语法的构造函数和析构函数,当离开作用域之后,栈空间的结构体会走析构函数。那么重点就在objc_autoreleasePoolPush 和 objc_autoreleasePoolPop。
通过汇编也可以看到这2个函数的存在。
->  0x100efba0e <+30>:  callq  0x100efc84c               ; symbol stub for: objc_autoreleasePoolPush
    0x100efba13 <+35>:  movq   %rax, -0x20(%rbp)
    0x100efba17 <+39>:  movq   0x5dc2(%rip), %rdi        ; (void *)0x0000000100f01bf0: AppDelegate
    0x100efba1e <+46>:  movq   0x5b6b(%rip), %rsi        ; "class"
    0x100efba25 <+53>:  callq  *0x360d(%rip)             ; (void *)0x00007ff80002d7c0: objc_msgSend
    0x100efba2b <+59>:  movq   %rax, %rdi
    0x100efba2e <+62>:  callq  0x100efc80a               ; symbol stub for: NSStringFromClass
    0x100efba33 <+67>:  movq   %rax, %rdi
    0x100efba36 <+70>:  callq  0x100efc870               ; symbol stub for: objc_retainAutoreleasedReturnValue
    0x100efba3b <+75>:  movq   -0x18(%rbp), %rdi
    0x100efba3f <+79>:  movq   %rax, -0x18(%rbp)
    0x100efba43 <+83>:  callq  *0x35f7(%rip)             ; (void *)0x00007ff80004b5c0: objc_release
    0x100efba49 <+89>:  movq   -0x20(%rbp), %rdi
    0x100efba4d <+93>:  callq  0x100efc846               ; symbol stub for: objc_autoreleasePoolPop
小结:autoreleasePool在底层就是一个结构体。
5、autoreleasepool的底层分析
直接查看objc的源码:
void *
objc_autoreleasePoolPush(void)
{
    return AutoreleasePoolPage::push();
}

void
objc_autoreleasePoolPop(void *ctxt)
{
    AutoreleasePoolPage::pop(ctxt);
}
继续查看AutoreleasePoolPage,发现它继承AutoreleasePoolPageData
/***********************************************************************
   Autorelease pool implementation

   A thread's autorelease pool is a stack of pointers.
   Each pointer is either an object to release, or POOL_BOUNDARY which is
	 an autorelease pool boundary.
   A pool token is a pointer to the POOL_BOUNDARY for that pool. When
	 the pool is popped, every object hotter than the sentinel is released.
   The stack is divided into a doubly-linked list of pages. Pages are added
	 and deleted as necessary.
   Thread-local storage points to the hot page, where newly autoreleased
	 objects are stored.
**********************************************************************/
翻译一下:
/**************************************************** *************************
   自动释放池实现
   线程的自动释放池是一堆指针。
   每个指针要么是要释放的对象,要么是 POOL_BOUNDARY自动释放池边界。
   池令牌是指向该池的 POOL_BOUNDARY 的指针。什么时候池被弹出,每个比哨兵更热的对象被释放。
   堆栈被分成一个双向链表的页面。页面已添加并在必要时删除。
   thread-local storage指向hot page,这里是新的autoreleased对象被存储。
****************************************************** *********************/
通过源码的注释可以知道:
- 自动释放和线程是一一对应的。
- 自动释放池是一个栈的结构。
- 自动释放池之间是通过双向链表连接。
- 自动释放池有一个哨兵对象(注意只在第一页添加一个哨兵对象),防止出栈释放时造成野指针或者其他内存问题,所以需要一个边界。
- 自动释放池会有hot page,类似LRU算法。
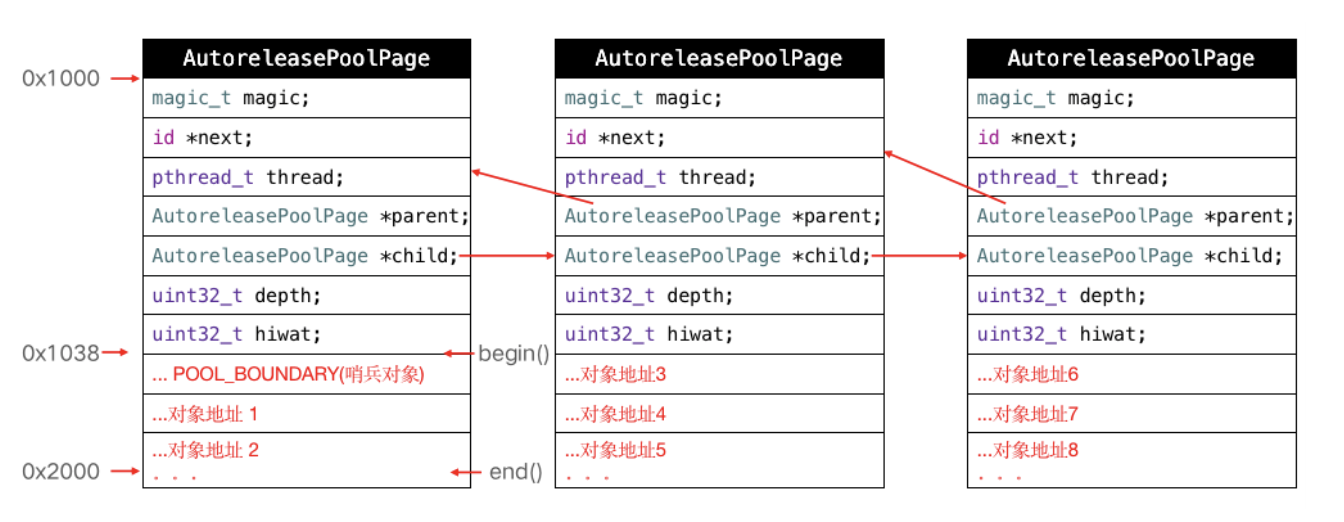
再看它具体的结构:
struct AutoreleasePoolPageData
{
	magic_t const magic;
	__unsafe_unretained id *next;
	pthread_t const thread;
	AutoreleasePoolPage * const parent;
	AutoreleasePoolPage *child;
	uint32_t const depth;
	uint32_t hiwat;

	AutoreleasePoolPageData(__unsafe_unretained id* _next, pthread_t _thread, AutoreleasePoolPage* _parent, uint32_t _depth, uint32_t _hiwat)
		: magic(), next(_next), thread(_thread),
		  parent(_parent), child(nil),
		  depth(_depth), hiwat(_hiwat)
	{
	}
};
- magic 用来校验AutoreleasePoolPage的结构是否完整
- next 指向最新添加的 autoreleasd 对象的下一个位置,初始化时指向begin()
- thread 指向当前线程
- parent 指向父结点,第一个结点的parent值为nil
- child 指向子结点,最后一个结点的child值为nill
- depth 代表深度,从0开始,往后递增1
- hiwat 代表high water mask
了解数据结构之后,继续来看push方法:
#   define POOL_BOUNDARY nil

static inline void *push()
    {
        id *dest;
        if (slowpath(DebugPoolAllocation)) {
            // Each autorelease pool starts on a new pool page.
            dest = autoreleaseNewPage(POOL_BOUNDARY);
        } else {
            dest = autoreleaseFast(POOL_BOUNDARY);
        }
        ASSERT(dest == EMPTY_POOL_PLACEHOLDER || *dest == POOL_BOUNDARY);
        return dest;
    }
(1)当要创建自动释放池时,会调用autoreleaseNewPage
   static __attribute__((noinline))
    id *autoreleaseNewPage(id obj)
    {
        AutoreleasePoolPage *page = hotPage();
        if (page) return autoreleaseFullPage(obj, page);
        else return autoreleaseNoPage(obj);
    }
这里从tls(线程私有数据)中取出hotPage。
- 判断hotPage是否存在,如果存在:
//如果存在此页,证明此页满了会调用autoreleaseFullPage:
 static __attribute__((noinline))
    id *autoreleaseFullPage(id obj, AutoreleasePoolPage *page)
    {
        // The hot page is full.
        // Step to the next non-full page, adding a new page if necessary.
        // Then add the object to that page.
        ASSERT(page == hotPage());
        ASSERT(page->full()  ||  DebugPoolAllocation);
        do {
            //判断是否有子页,如果有继续循环判断是否满的状态,如果没有就创建新的页
            if (page->child) page = page->child;
            else page = new AutoreleasePoolPage(page);
        } while (page->full());

        setHotPage(page);
        return page->add(obj);
    }
- 如果hotPage不存在:
//直接创建一个新页
 static __attribute__((noinline))
    id *autoreleaseNoPage(id obj)
    {
        //....
        // Install the first page.
        AutoreleasePoolPage *page = new AutoreleasePoolPage(nil);
        setHotPage(page);

        // Push a boundary on behalf of the previously-placeholder'd pool.
        if (pushExtraBoundary) {
            page->add(POOL_BOUNDARY);
        }
        // Push the requested object or pool.
        return page->add(obj);
    }
(2)当要加入autolease对象时:
static inline id *autoreleaseFast(id obj)
    {
        AutoreleasePoolPage *page = hotPage();
        if (page && !page->full()) {
            return page->add(obj);
        } else if (page) {
            return autoreleaseFullPage(obj, page);
        } else {
            return autoreleaseNoPage(obj);
        }
    }
继续分析AutoreleasePoolPage添加对象的操作,首先看下AutoreleasePoolPage的构造方法:
AutoreleasePoolPage(AutoreleasePoolPage *newParent) :
		AutoreleasePoolPageData(begin(),
								objc_thread_self(),
								newParent,
								newParent ? 1+newParent->depth : 0,
								newParent ? newParent->hiwat : 0)
    {
        if (objc::PageCountWarning != -1) {
            checkTooMuchAutorelease();
        }

        if (parent) {
            //绑定双向链表
            parent->check();
            ASSERT(!parent->child);
            parent->unprotect();
            parent->child = this;
            parent->protect();
        }
        protect();
    }
- begin(),要添加autorelease的位置
  id * begin() {
        return (id *) ((uint8_t *)this+sizeof(*this));
  }
this是AutoReleasePool的首地址,sizeof(*this)是本身的内存大小,那么begin就是从AutoReleasePage本身内存大小开始的。
可以打印一下sizeof(*this),其结果为56,下面注释是每一个成员所占内存大小:
struct AutoreleasePoolPageData
{
	magic_t const magic;  //16
	__unsafe_unretained id *next; //8
	pthread_t const thread;  //8
	AutoreleasePoolPage * const parent; //8
	AutoreleasePoolPage *child;     //8
	uint32_t const depth;   //4
	uint32_t hiwat;     //4
}
struct magic_t {
	uint32_t m[4]; //16
}
下面通过一个api来打印一下释放池的数据:(先用MRC)
extern void _objc_autoreleasePoolPrint(void);

int main(int argc, const char * argv[]) {
    @autoreleasepool {
        TestObject *object = [[TestObject alloc] autorelease];
        NSLog(@"object = %p",object);
        _objc_autoreleasePoolPrint();
    }
    return 0;
}
打印结果如下:
object = 0x60000000c010
objc[4377]: ##############
objc[4377]: AUTORELEASE POOLS for thread 0x100094600
objc[4377]: 2 releases pending.
objc[4377]: [0x102009000]  ................  PAGE  (hot) (cold)
objc[4377]: [0x102009038]  ################  POOL 0x102009038
objc[4377]: [0x102009040]    0x60000000c010  TestObject
objc[4377]: ##############
0x60000000c010对象被加入到了释放池中。然后用0x102009038(哨兵对象)- 0x102009000(首地址)正好等于56。另外可以看下autorelease的方法调用堆栈:
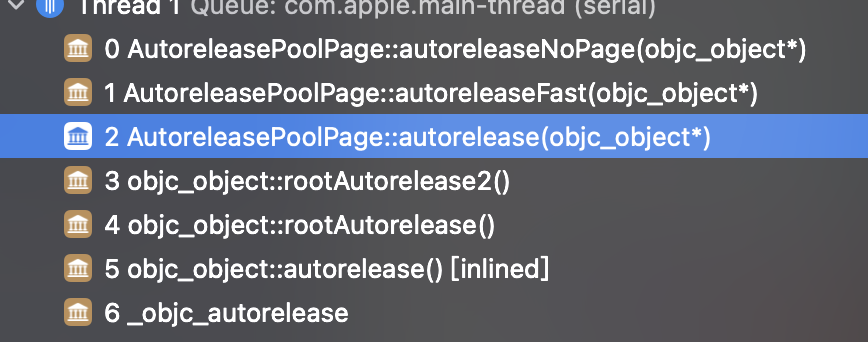
最终会走到autoreleaseNoPage函数中,进行添加。
  id *add(id obj)
    {
        ASSERT(!full());
        unprotect();
        id *ret;
    //........
        ret = next;  // faster than `return next-1` because of aliasing
        *next++ = obj;
#if SUPPORT_AUTORELEASEPOOL_DEDUP_PTRS
        // Make sure obj fits in the bits available for it
        ASSERT(((AutoreleasePoolEntry *)ret)->ptr == (uintptr_t)obj);
#endif
     done:
        protect();
        return ret;
    }
其中add函数,就是通过内存平移来压栈的。
继续做一个测试,看一下自动释放池一页有多大。
 @autoreleasepool {
     int count = 502+2
        for (int i = 0; i < count; i ++) {
            TestObject *object = [[TestObject alloc] autorelease];
        }
        _objc_autoreleasePoolPrint();
    }
通过尝试改变count,发现当count = 504的时候,当前自动释放池会满。
那么可以计算出一页的大小为:504(autorelease对象) * 8 + 8(哨兵对象) + 56(page的自身大小) = 4096。从源码也可以找到对应的大小:
#define PAGE_MIN_SHIFT          12
#define PAGE_MIN_SIZE           (1 << PAGE_MIN_SHIFT)
其中 1 << 12 = 4096。
注意:因为第一页有一个哨兵对象,所以第一页可以存504个对象,大于第一页的可以存505个对象。
关于自动释放池释放就是出栈的过程,需要注意的一点是,是释放子页面,再释放父页面。
小结:借用一张结构图:
七、自动释放池相关问题
1、自动释放池的嵌套使用
直接看一个demo:
int main(int argc, const char * argv[]) {

    @autoreleasepool {
        TestObject *object1 = [[TestObject alloc] autorelease];
        NSLog(@"object1 = %p",object1);
        @autoreleasepool {
            TestObject *object2 = [[TestObject alloc] autorelease];
            NSLog(@"object1 = %p",object2);
            _objc_autoreleasePoolPrint();
        }
        _objc_autoreleasePoolPrint();
    }
    return 0;
}
看打印结果:
object1 = 0x60000000c010
object2 = 0x600000014000
bjc[44195]: ##############
objc[44195]: AUTORELEASE POOLS for thread 0x100094600
objc[44195]: 4 releases pending.
objc[44195]: [0x102809000]  ................  PAGE  (hot) (cold)
objc[44195]: [0x102809038]  ################  POOL 0x102809038
objc[44195]: [0x102809040]    0x60000000c010  TestObject
objc[44195]: [0x102809048]  ################  POOL 0x102809048
objc[44195]: [0x102809050]    0x600000014000  TestObject
objc[44195]: ##############
123objc[44195]: ##############
objc[44195]: AUTORELEASE POOLS for thread 0x100094600
objc[44195]: 2 releases pending.
objc[44195]: [0x102809000]  ................  PAGE  (hot) (cold)
objc[44195]: [0x102809038]  ################  POOL 0x102809038
objc[44195]: [0x102809040]    0x60000000c010  TestObject
objc[44195]: ##############
从打印结果来看:
- 第一次打印结果中包含object1和object2,同时会有2个POOL,原因是嵌套的自动释放池也会被外层的自动释放池给压栈,所以外层自动释放池的栈中会包含嵌套的自动释放池。
- 当嵌套的自动释放池出了作用域后,会出栈释放,所以第二次打印结果就只有外层的自动释放池。
总结:自动释放池可以嵌套使用,会被外层的自动释放池当作自动释放池对象进行压栈。
2、AutoReleasePool和Runloop的关系
平时开发中不需要手动创建自动释放池,因为Runloop会自动创建和销毁AutoreleasePool对象。
- 在之前的系统版本中:
App启动后,系统在主线程RunLoop里注册了两个Observer,其回调都是_wrapRunLoopWithAutoreleasePoolHandler()。
第一个Observer监视一个事件:
(1)Entry(即将进入Loop):调用objc_autoreleasePoolPush来创建自动释放池。
第二个Observer监视了两个事件:
(1)Before waiting(准备进入休眠):先调用objc_autoreleasePoolPop销毁旧的自动释放池,再调用objc_autoreleasePoolPush创建一个新的自动释放池。
(2)Exit(即将退出Loop):调用objc_autoreleasePoolPop销毁自动释放池。
其中第一个observe的order是-2147483647,优先级最高,保证创建释放池发生在其他所有回调之前。
第二个Observer的order是2147483647,优先级最低,保证销毁自动释放池发生在其他所有回调之后。
- 通过对swift的Foundation源码查看,发现自动释放池在RunLoop中有所变化:
首先是有2个函数:begin和end
static inline uintptr_t __CFRunLoopPerCalloutARPBegin(CFRunLoopRef rl) {
#if DEPLOYMENT_RUNTIME_OBJC
    return !rl || rl->_perCalloutARP ? _CFAutoreleasePoolPush() : 0;
#else
    return 0;
#endif
}

static inline void __CFRunLoopPerCalloutARPEnd(const uintptr_t pool) {
#if DEPLOYMENT_RUNTIME_OBJC
    if (pool) {
        @try {
            _CFAutoreleasePoolPop(pool);
        } @catch (NSException *e) {
            os_log_error(_CFOSLog(), "Caught exception during runloop's autorelease pool drain of client objects %{public}@: %{private}@ userInfo: %{private}@", e.name, e.reason, e.userInfo);
            objc_terminate();
        } @catch (...) {
            objc_terminate();
        }
    }
#endif
}
然后分别在__CFRunLoopDoTimer、__CFRunLoopDoBlocks、__CFRunLoopDoObservers、__CFRunLoopDoSource0、__CFRunLoopDoSource1 以及gcd主队列回调前和回调后。
调用:CFRUNLOOP_ARP_BEGIN 和 CFRUNLOOP_ARP_END
这样的好处是,更能及时的去释放对象,降低内存峰值。
3、AutoReleasePool手动创建的使用场景
(1)编写不基于UI框架的程序,例如命令行工具。此时是面向过程的开发,可能并不需要RunLoop,所以需要手动去创建AutoReleasePool。
(2)编写非Cocoa程序时创建子线程。
Cocoa程序中的每个线程都维护自己的自动释放池块堆栈。
 static void tls_dealloc(void *p)
    {
        if (p == (void*)EMPTY_POOL_PLACEHOLDER) {
            // No objects or pool pages to clean up here.
            return;
        }
        // reinstate TLS value while we work
        setHotPage((AutoreleasePoolPage *)p);

        if (AutoreleasePoolPage *page = coldPage()) {
            if (!page->empty()) objc_autoreleasePoolPop(page->begin());  // pop all of the pools
            if (slowpath(DebugMissingPools || DebugPoolAllocation)) {
                // pop() killed the pages already
            } else {
                page->kill();  // free all of the pages
            }
        }

        // clear TLS value so TLS destruction doesn't loop
        setHotPage(nil);
    }
从objc源码中可以找到,因为每一个AutoReleasePool和线程是一一对应的,当线程销毁的时候会触发tls_dealloc去释放。
而编写一个非Cocoa程序,比如Foundation-only program,这时如果创建了子线程,若不手动创建自动释放池,自动释放的对象将会堆积得不到释放,导致内存泄漏。
(3)编写一个创建大量临时对象的循环。(这个是平时开发中最可能遇到的)
//情况一:循环内不使用AutoreleasePool
for (int i = 0; i<1000000; i++) {

    NSObject *object = [NSObject alloc] init];
    NSLog(@" ==== %p", object);
}

//情况二:循环内使用AutoreleasePool
for (int i = 0; i<1000000; i++) {
    @autoreleasepool {
         NSObject *object = [NSObject alloc] init];
        NSLog(@" ==== %p", object);
    }
}
情况一:循环过程中,创建的NSObject对象一直在堆积,只有在循环结束才一起释放,所以内存一直在增加。
情况二:每一次迭代中都会创建并销毁一个AutoreleasePool,而每一次创建的NSObject对象都会加入到AutoreleasePool中,所以在每次AutoreleasePool销毁时,NSObject对象就会被释放,这样内存就不会增加。